Last updated on November 24th, 2022 at 03:44 pm
Do you create Facebook ads to promote your business or a client’s business?
Thinking of how the Facebook pixel can help improve ad delivery on specific business goals?
Then this article will become your guide on how to set up, install and use the Facebook pixel to track website conversions and create optimized Facebook ads.
What is the Facebook Pixel?
The Facebook pixel is a piece of JavaScript code that you add to the header of your website. Simply put, the Facebook pixel is the tool that makes the difference between a successful ad campaign and a failed one.
It receives data that enables you to monitor conversions from Facebook ads, optimizes ads, builds Facebook-targeted audiences for ads in the future and remarkets to audiences who have already interacted with your brand by taking specific actions on your website.
Facebook refers to these actions on the website as ”events”.
See Also: How To Target Wealthy Individuals With Facebook Ads
How Does the Facebook Pixel Work?
The Facebook pixel works hand-in-hand with the browser. This is made possible by adding and triggering cookies to track users behaviour as they engage with your brand both on and off of Facebook and Instagram.
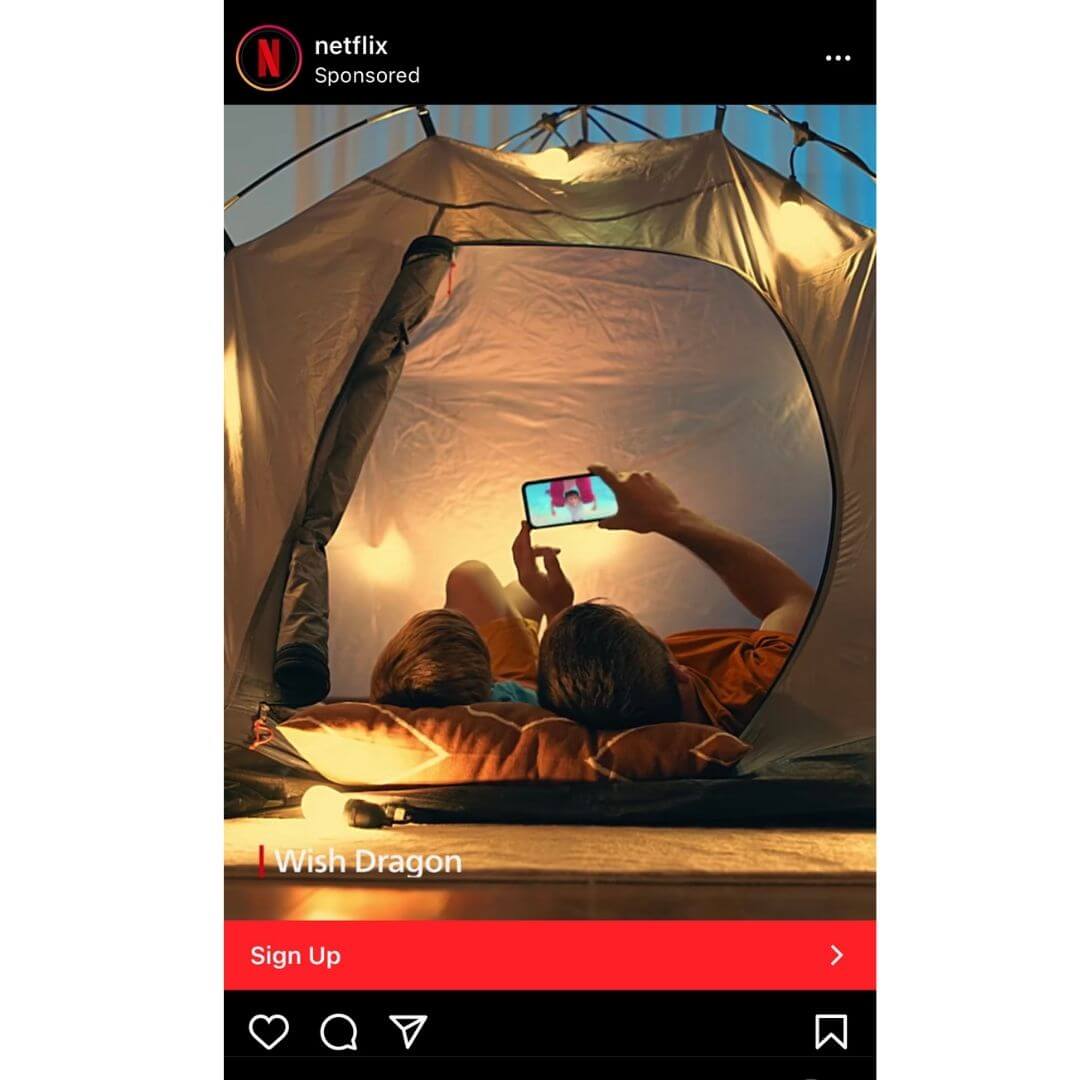
For example, I recently was going through the Netflix plan on their website. (At the time, I was thinking of upgrading my current plan to according my immediate needs).
I did not complete the upgrade right away as I got distracted by a client call that came in on the phone.
The next time I opened up Instagram, this ad popped up in the newsfeed:
Source: Netflix on Instagram
And, sure enough, the next time I headed to Facebook on my laptop…

Source: Netflix on Facebook
This type of marketing is called retargeting. This is a smart marketing approach to remind online shoppers to return and buy all the items they forget in the shopping carts across the web.
Besides remarketing, there are other functions and benefits of the Facebook pixel. Let’s take a look at why you need the Facebook Pixel.
See Also: How to Fix Disabled Facebook Ad Account Really Fast
8 Benefits of Using the Facebook Pixel
The greatest benefit that comes with social media advertising is the ability to test and learn, track, optimize and target your ads with more precision. The Facebook pixel is a data-driven designed tool that helps advertisers like yourself to get the most of your ads on both Facebook and Instagram.
With Facebook pixel, you have the power to build, target and track the right audience on Facebook, including:
- Track the number of conversions like lead signups, website purchases, cost per acquisition (CPA) and campaign conversion rate (CVR).
- Smart revenue reporting: with Facebook pixel, you are able to track the actual order value. Hence, it helps you to measure return on ad spend (ROAS) more accurately.
- Examine your sales funnel. For example, at Primegate Digital we might examine Leads> Free Webinar >Purchases as our customer journey. In the e-commerce niche, you will compare the number of products viewed with the add to baskets, initiated checkout and the number of purchases. When you analyze this conversion rate and notice a percentage at any stage, then you can focus on optimizing the campaign at that stage of the funnel.
- Create website custom audiences of all website visitors for remarketing.
- Build specific audiences of people that have taken the action that you care about the most (purchases, leads). This improves your ad experience and saves you money.
- Create similar audiences called lookalike audiences really fast. Facebook pixel-based lookalike audiences updates dynamically and evergreen for cold traffic campaigns.
- Easily optimize for conversions. This helps to target the exact audiences that are interested in your products or services. The pixel maximizes your return on investment (ROI).
- You can create a dynamic product ad (DPA). This helps you to retarget recent website visitors with the exact viewed products.
These benefits show how important it is to have a Facebook pixel.
Facebook Pixel Standard Events
There are 17 standard events that Facebook supports. You can easily copy and paste these event codes on your website.
- Purchase: This signifies a purchase completed on your website.
- Lead: This signifies signs up for a trial or otherwise see themselves as website lead.
- Complete registration: This signifies when someone completes a registration form on your website, such as a form submission.
- Add to wishlist: When someone adds a product to a wishlist on your website.
- Initiate checkout: When someone starts the checkout process to purchase items from your site.
- Search: When someone uses the search function to find a product on your website.
- Add to cart: When someone adds a product to their shopping basket on your site.
- View content: When someone lands on a specific page of your website.
- Add payment info: When someone inputs their payment information in the purchase journey on your website.
- Contact: When someone reaches out to your business.
- Customize product: When someone chooses a specific type of product, such as selecting a certain color.
- Donate: When someone donates to your cause on your website.
- Find location: When someone searches for your brick-and-mortar store location.
- Schedule: When someone books a meeting at your business.
- Start trial: When someone signs up for a free trial of your product or service.
- Submit application: When someone submits an application for your product, service, or program.
- Subscribe: When someone subscribes to your paid product or service.
You also have the opportunity to add standard events using extra-base code known as ”parameters”. This enables you to customize the standard events based on conditions like:
- Content type
- Currency
- The worth of a conversion event
- Predicted long-term value
For instance, you could use the Facebook tracking pixel to record content views on the specific product categories on your site, rather than tracking all views. Perhaps, you want to separate bird owners from rabbit owners based on which category of your pet supply was viewed.
See Also: How To Create Facebook Ads With Almost No Training
The Facebook Pixel and iOS 14.5 Changes
In April 2021, Apple released changes with iOS 14.5 that impact how Facebook receives and processes standard and custom events from tools like the Facebook pixel and SDK.
As a result of these changes, Facebook advertisers running campaigns to iOS 14.5 and later users will be impacted by limitations on data sharing.
You may experience changes in the number of reported conversions and some attribution windows will be unavailable. Also, one major change is that advertisers can only set up a maximum of 8 standard events and custom conversions per domain.
If you run Facebook and Instagram ads consistently for your business or plan to do so in the future, the Facebook pixel is a must-use tool. Coupled with the iOS 14 changes, it has become more important than ever to deploy pixel best practices.
How to Create Facebook Pixel
At this point, you understand what a pixel is, what you can measure and why you would do so, it’s time to create your Facebook pixel and install it on your website.
Step 1: Create a Facebook pixel
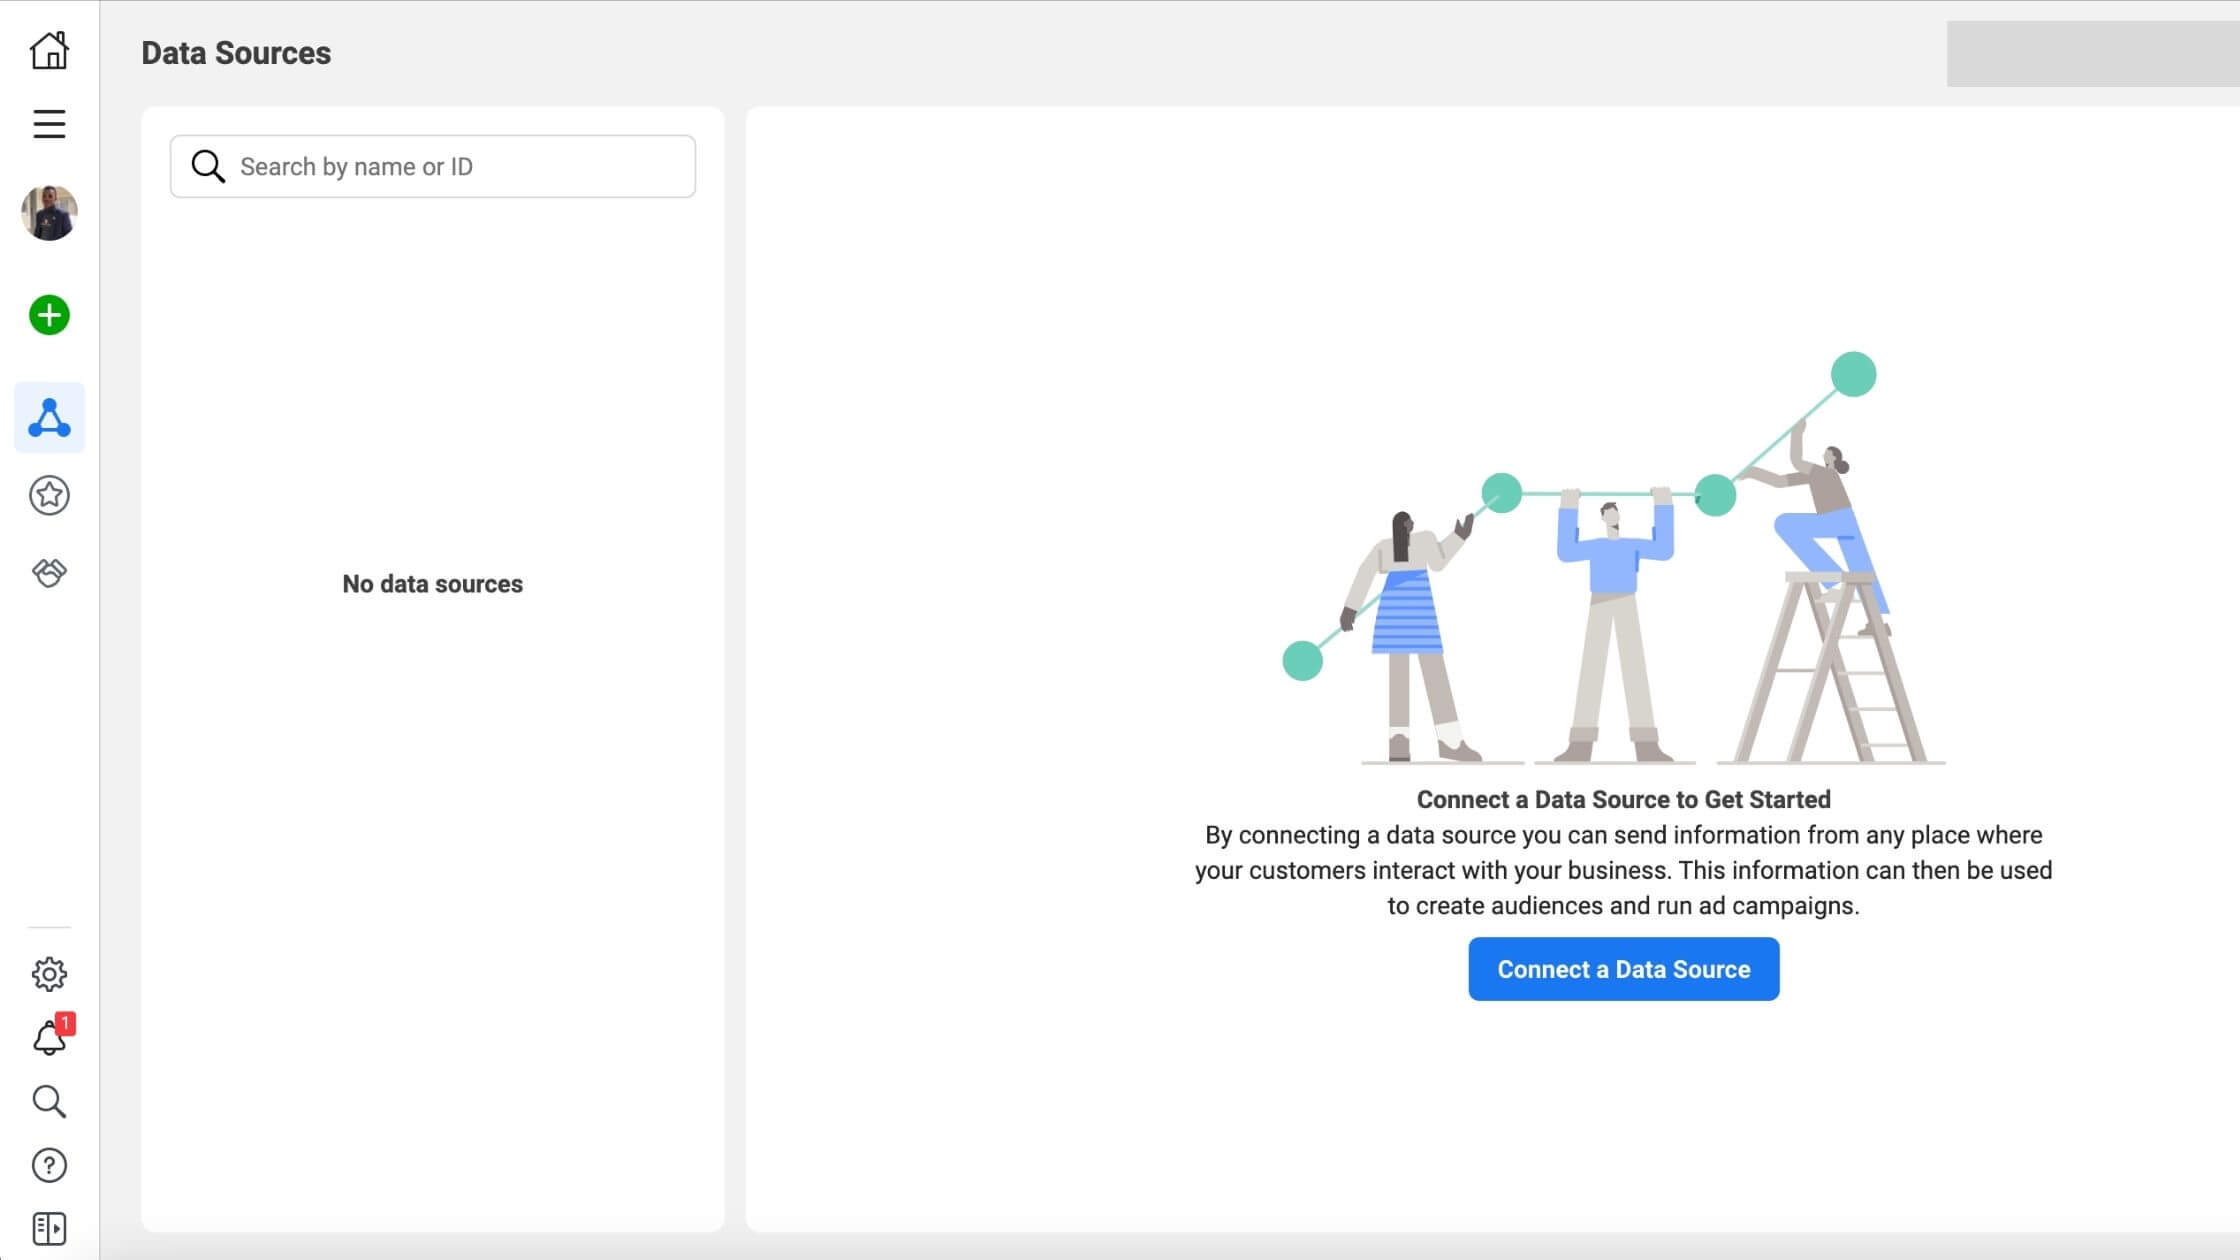
1. From your Facebook Events Manager, navigate to All Tools > Events Manager > in the left-hand menu tab,
Source: Facebook Events Manager
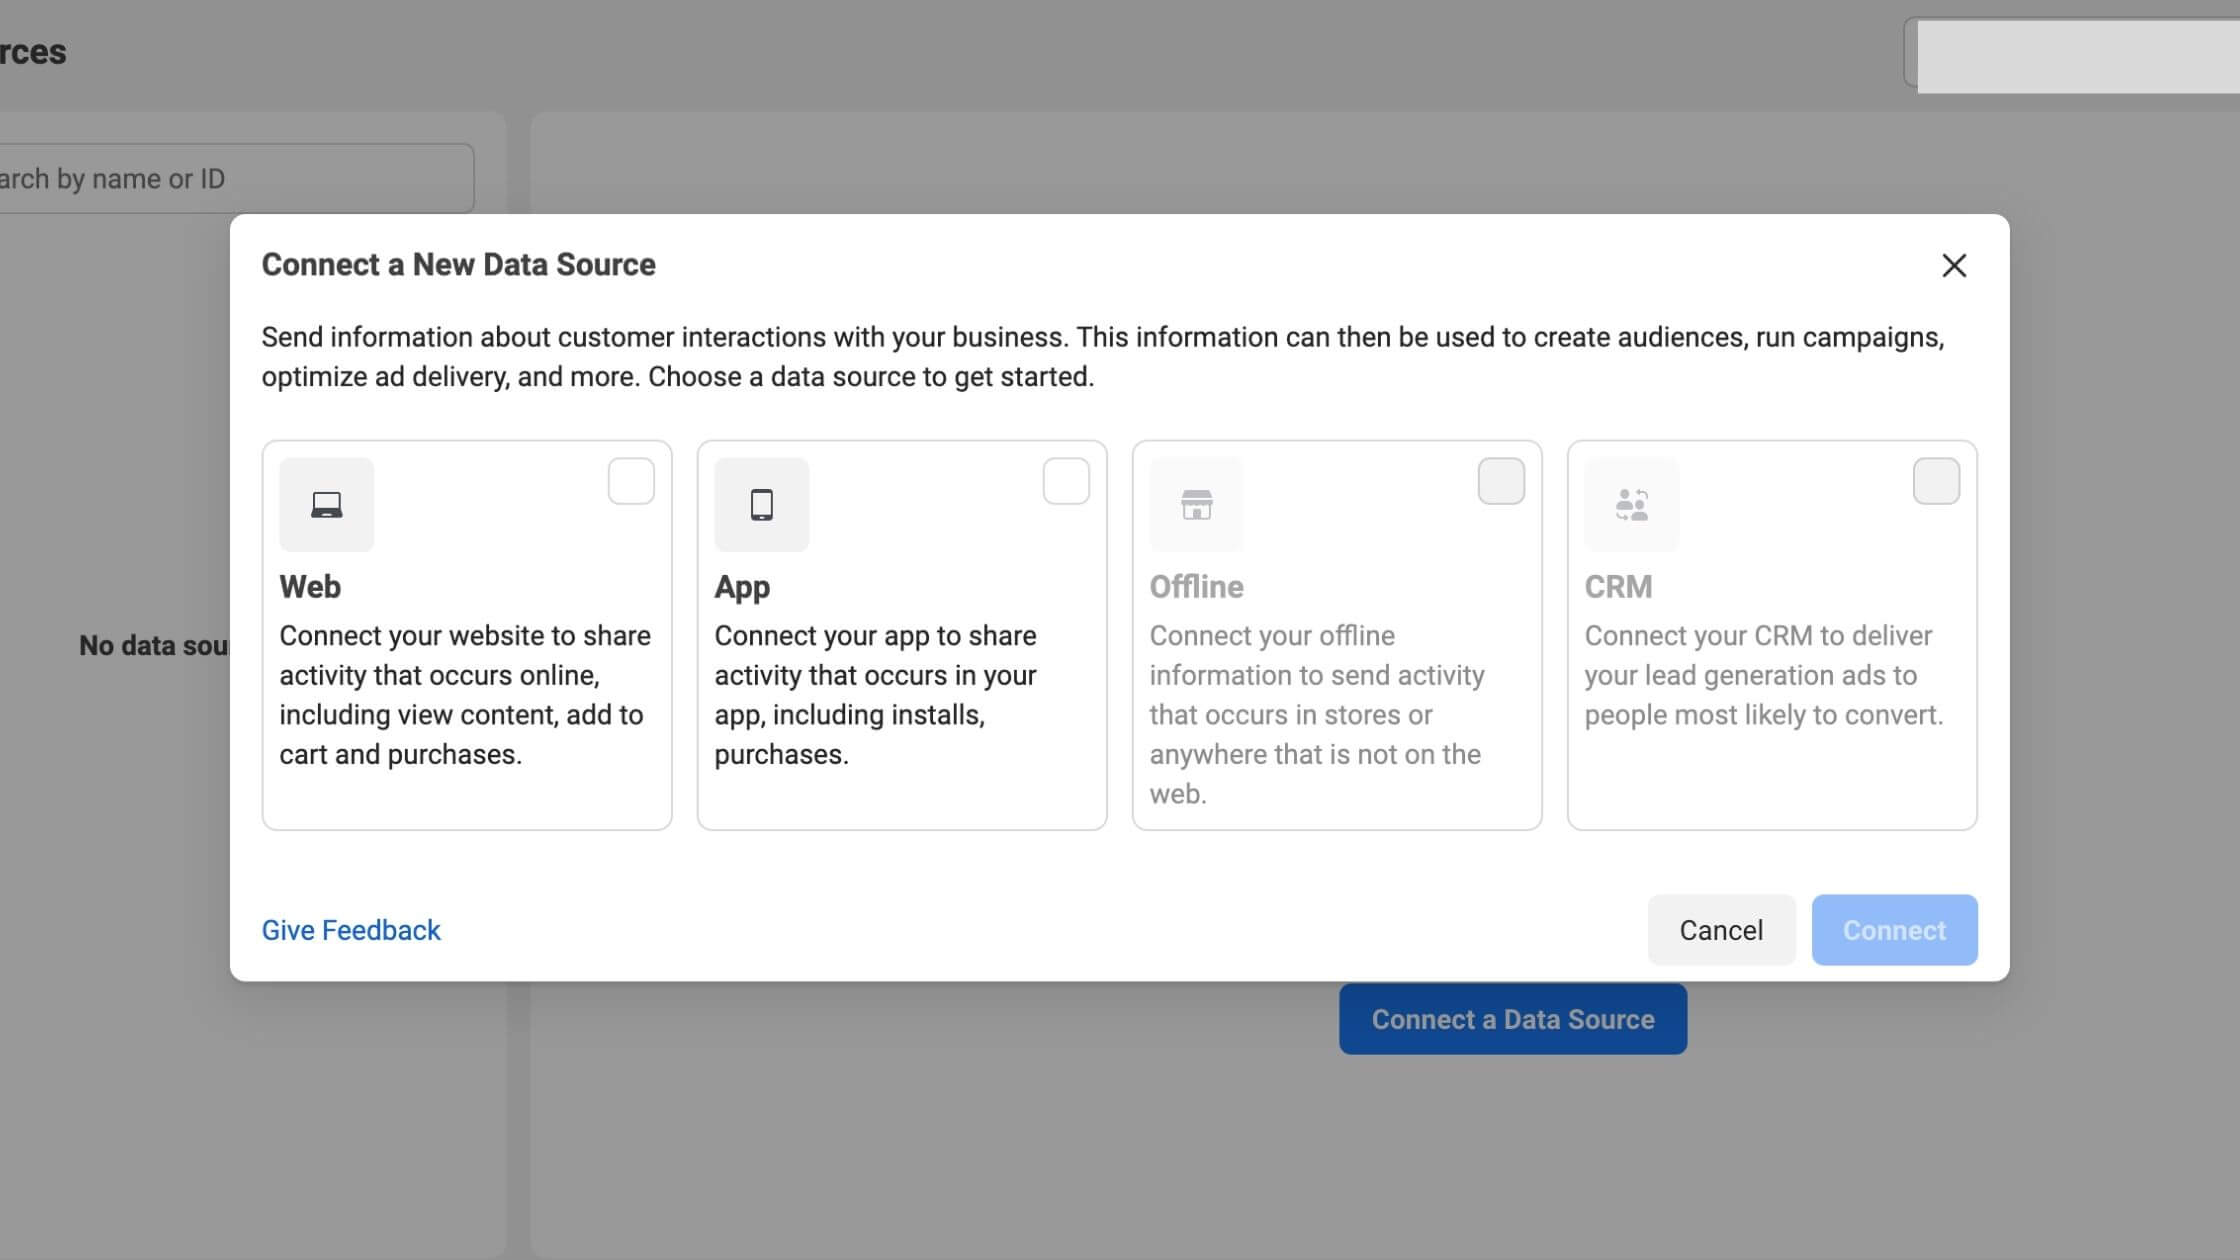
2. Then click Connect a Data Source and select Web. Click Connect.
Source: Facebook Events Manager
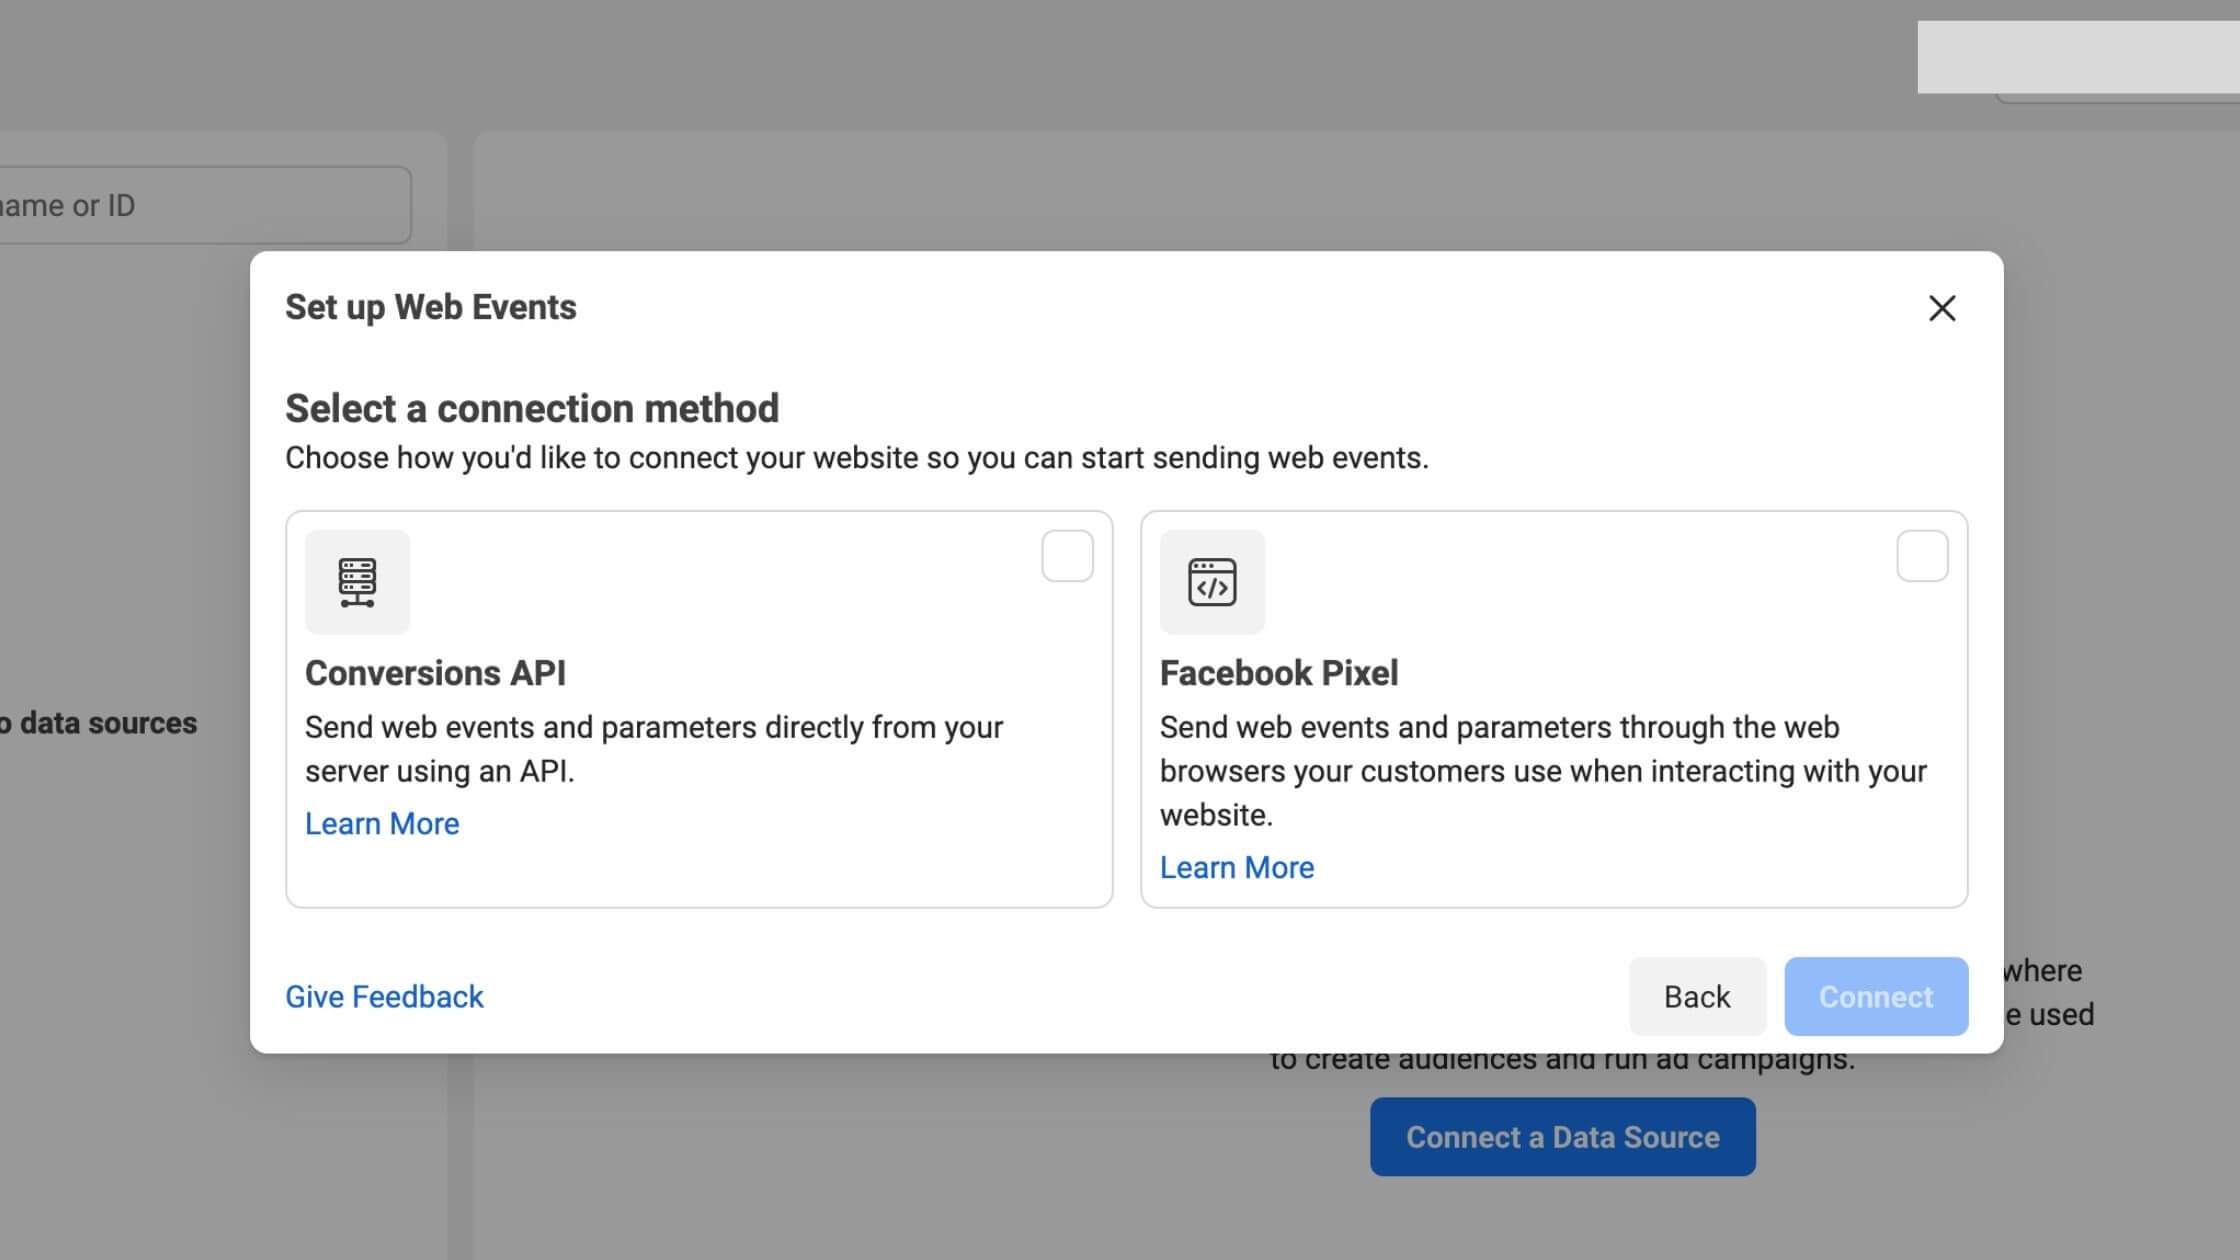
3. On the connection method, select Facebook Pixel, then click Connect.
Source: Facebook Events Manager
Next, give your pixel a name, enter your website URL, and click Continue.
![]()
Source: Facebook Events Manager
When naming your Facebook pixel, have it in mind that you can only create one pixel per ad account with the Events Manager. Your pixel name should represent your brand and not a specific campaign.
If manages more than one website for a client or have one for yourself, you may want to apply more than one pixel per ad account, you can do so using Facebook Business Manager.
See Also: 12 Biggest Facebook Ads Mistakes To Avoid
Step 2: Add the Facebook Pixel Base Code to Your Website
To activate the pixel and enjoy its benefits of it you have to install the Facebook pixel base code on your website pages.
There are several ways how to set up a Facebook pixel to achieve this depending on your Content Management system.
![]()
Source: Facebook Events Manager
- If your website is one of Facebook’s integration partners, like WordPress, Magento, Joomla or SquareSpace, select Use a Partner Integration. This installation method is a walkthrough without using code.
- Perhaps you have a web developer or someone else who manages your website, click Email Instructions to send your developer the information they need to set. up the Facebook pixel.
- If none of the above options applies then you need to insert the pixel base code directly on your website header. We will work you through this as well.
How to Install Facebook Pixel on WordPress
Now you have created your Facebook pixel. Next is to install the Facebook pixel.
Step 1: Set up Facebook Pixel with Partner Integration
1. Select Use a Partner Integration and select WordPress under choose a partner.
![]()
Source: Facebook Events Manager
2. Connect the WordPress account to Facebook.
![]()
Source: WordPress
- Navigate to Plugins on the left menu and click Add New.
- Search and select Facebook for WordPress.
- Click Install Now and then select Activate.
3. Connect your business to Facebook
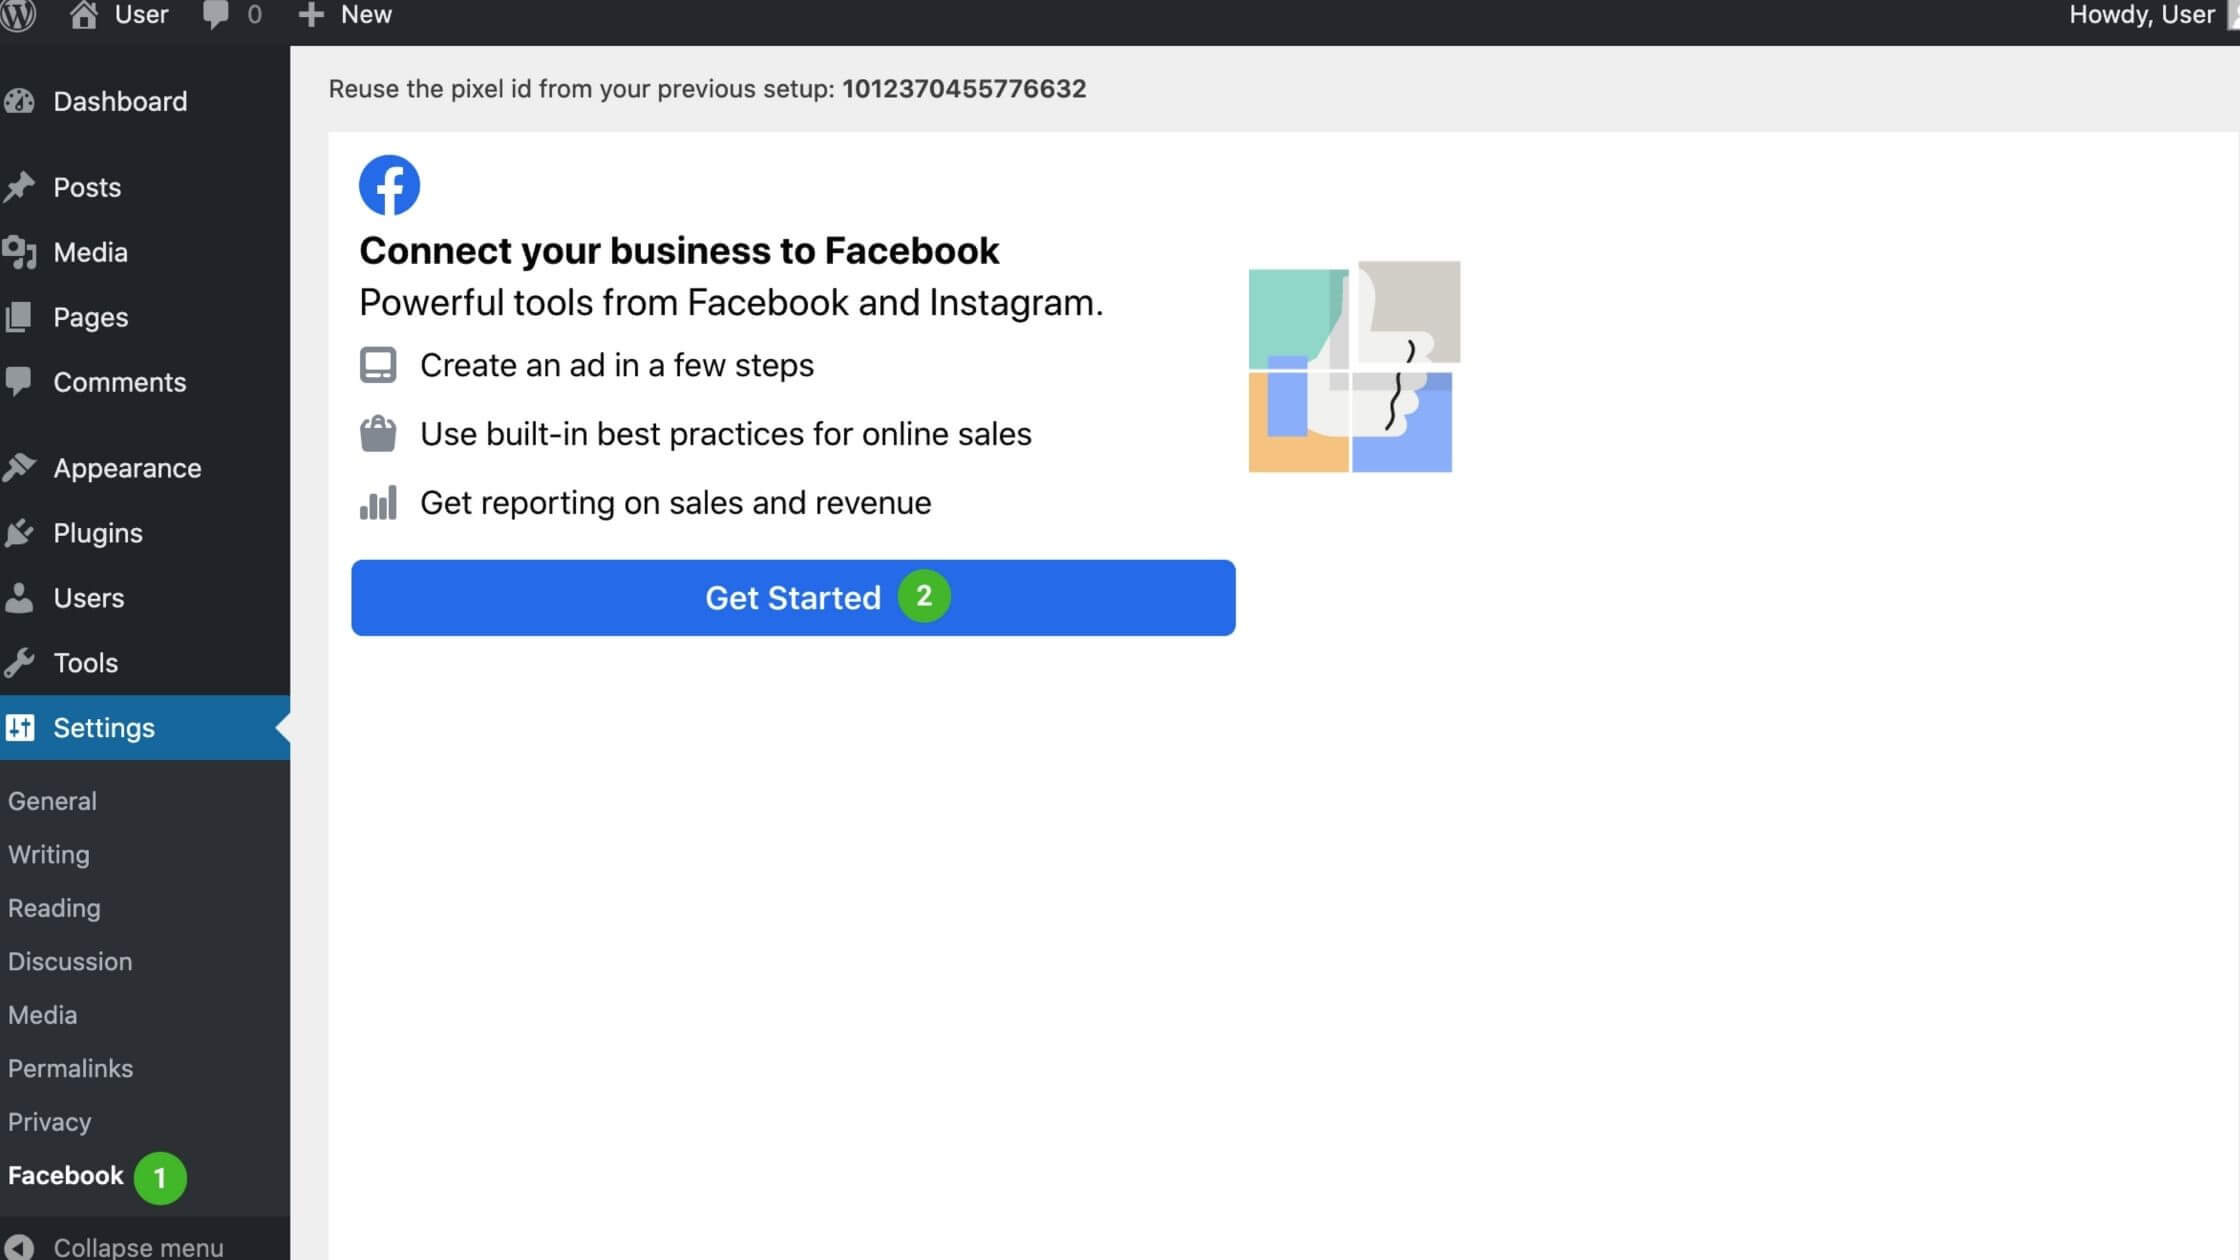
Source: WordPress
- Click Settings at the left menu and choose Facebook.
- Search Get Started and follow the instructions.
See Also: How to Grow TikTok Followers Really Fast
How to Install Facebook Pixel on Shopify
With Facebook pixel, you can integrate your online store with the Facebook channel.
Firstly, to add a Facebook pixel, you need to activate the data-sharing option in the Customer data-sharing section of your Facebook.
You can manage your Facebook pixel by visiting the Facebook channel section and clicking through to the Data sharing settings within the Settings section.
At the Facebook channel in the Customer data-sharing section of your Data sharing settings, you will find the list of already created pixels.
Click Connect to add an already existing Facebook pixel to your Shopify or click Create New to create a new Facebook pixel.
Once you have successfully added your Facebook pixel to your online store, make sure that it’s working by using Facebook Ads Manager verify.
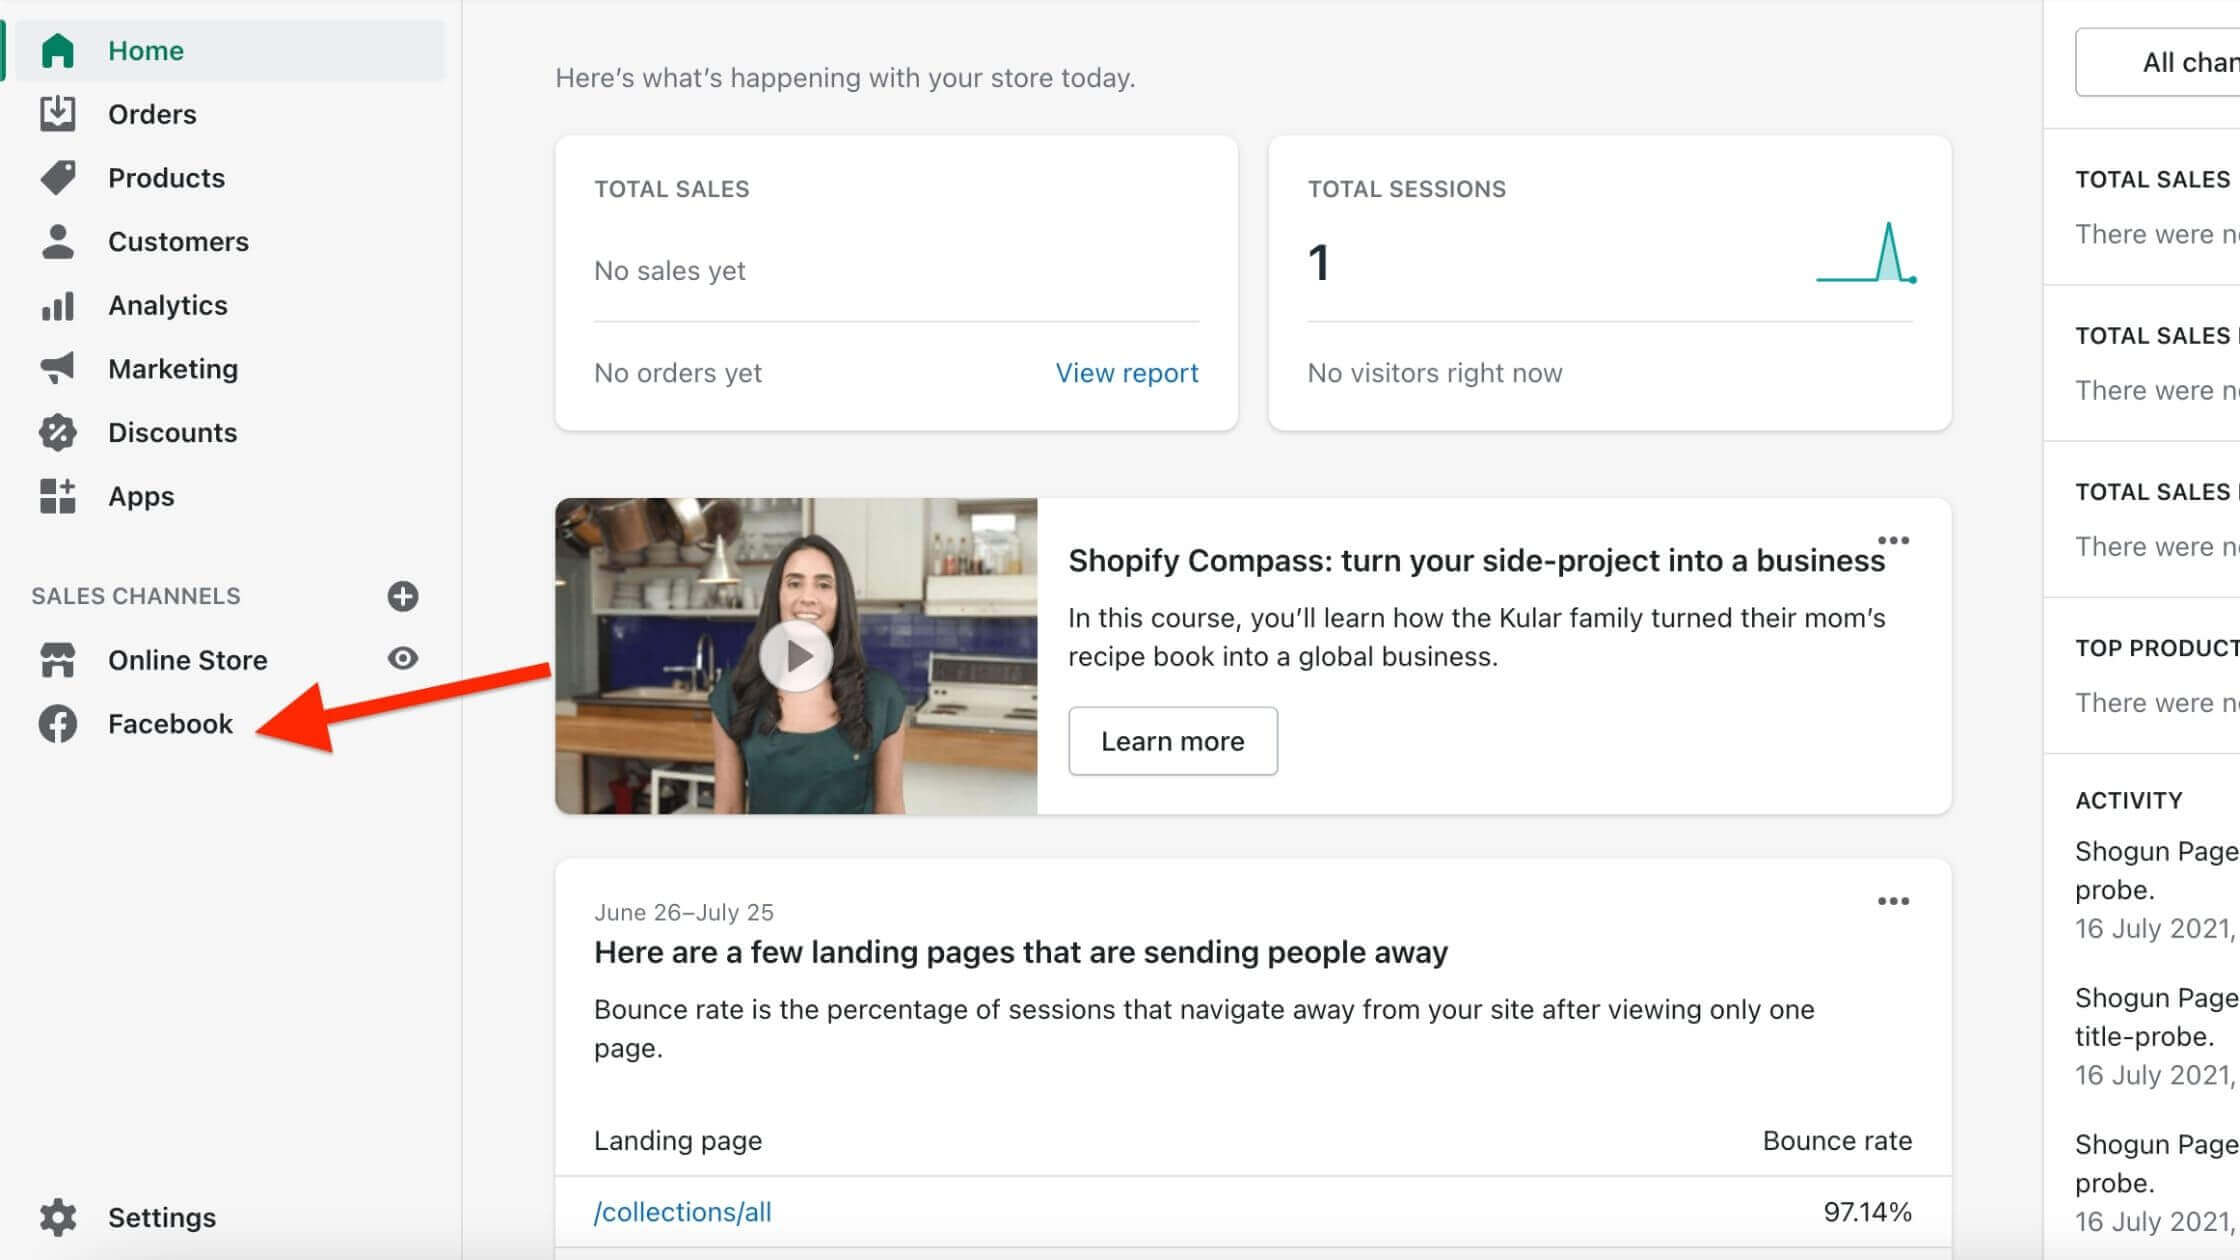
Source: Shopify.
Steps to Set up Facebook Pixel in Shopify
- Log in to your Shopify admin panel.
- Click Facebook in the Sales channels section.
- Navigate to Settings, and then click Data sharing settings.
- At the Customer data-sharing tab, click the Enable data-sharing toggle.
- In the Choose data-sharing level section choose Standard, Enhanced, or Maximum.
- Then choose your preferred pixel from the list options.
- Finally, click Confirm.
How to Install Facebook Pixel Manually (Using Code)
![]()
Source: Facebook Events Manager
1. Select Install code manually.
2. Click the green Copy Code button.
3. Paste the Facebook pixel code into the header section of your website, immediately after the </head> tag. You need to locate this in your theme. The location varies per platform.
4. Click Continue.
5. Decide whether to use automatic advanced matching. This feature matches hashed customer data from your website to Facebook profiles. This allows you to measure conversions more precisely and build more comprehensive custom audiences.
6. Lastly, click Continue.
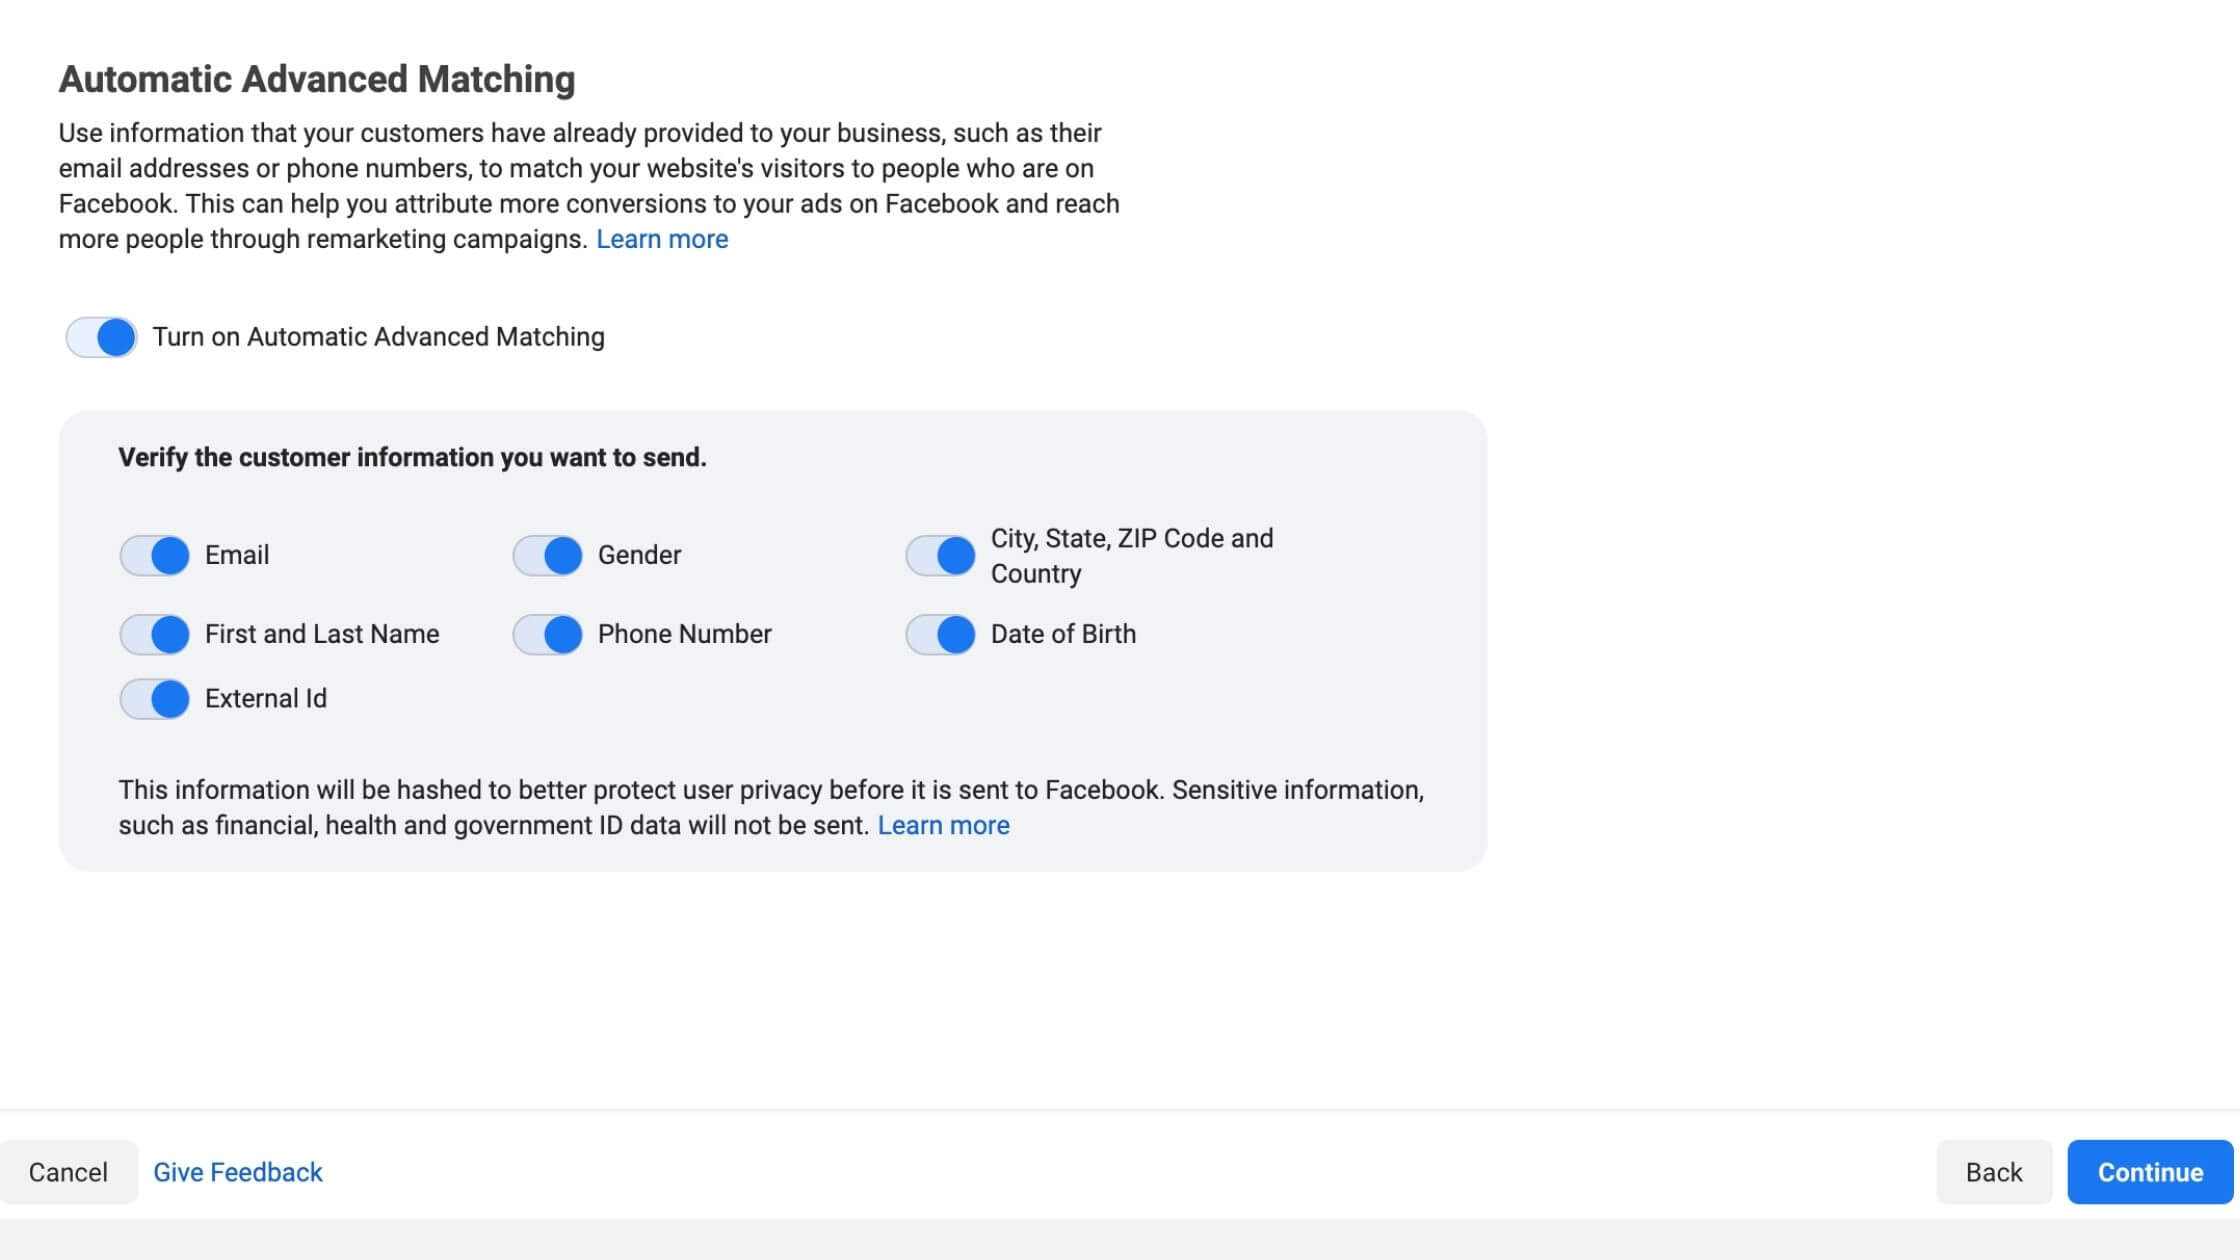
Source: Facebook Events Manager
How Do I Know If My Facebook Pixel Is Working?
To verify that your Facebook Pixel is installed accurately on your website, Facebook has a chrome extension tool that helps you achieve that. It is called the Facebook Pixel Helper.
How to Install Facebook Pixel Helper Chrome Extension
1. Goto google.com
2. Search for Facebook Pixel Helper
3. Install and Activate.
Once you visit any website and see the Facebook Pixel Chrome Extension greyed out, it means that it does not have a pixel installed.
Facebook Pixel in Action
For this example, you can see that Allstylefit website doesn’t have a Facebook Pixel installed:
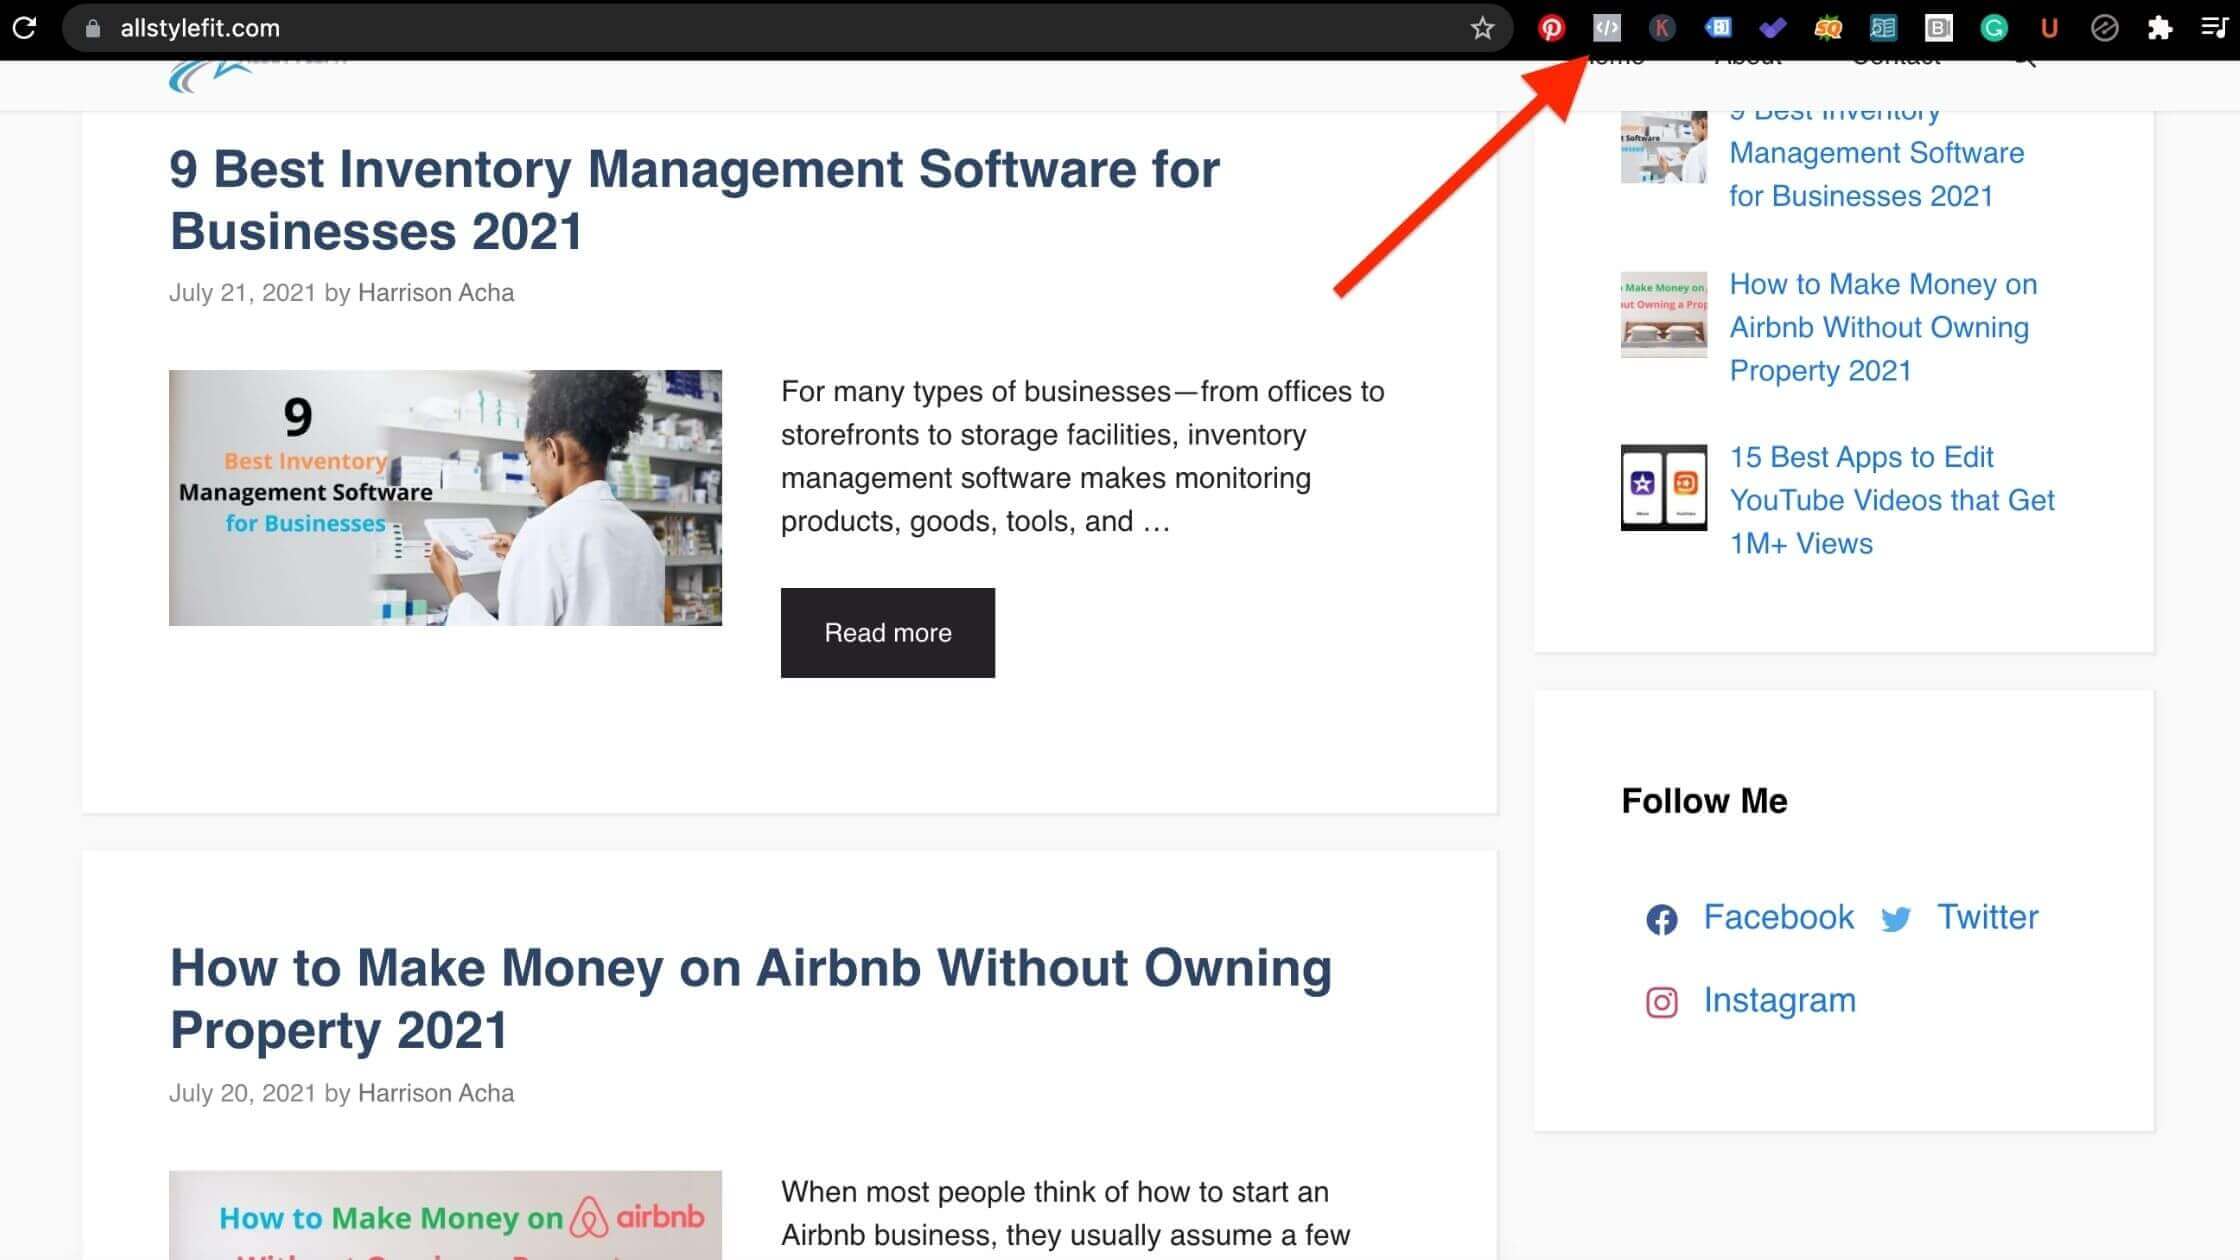
If you visit a website and see the Facebook Pixel Helper icon is colored in blue, then you have successfully installed the Facebook pixel. Congratulations!
Facebook Pixel in Action
In this example, you can see Primegate Digital shows the Facebook Pixel Helper in blue, so it is firing on the page.
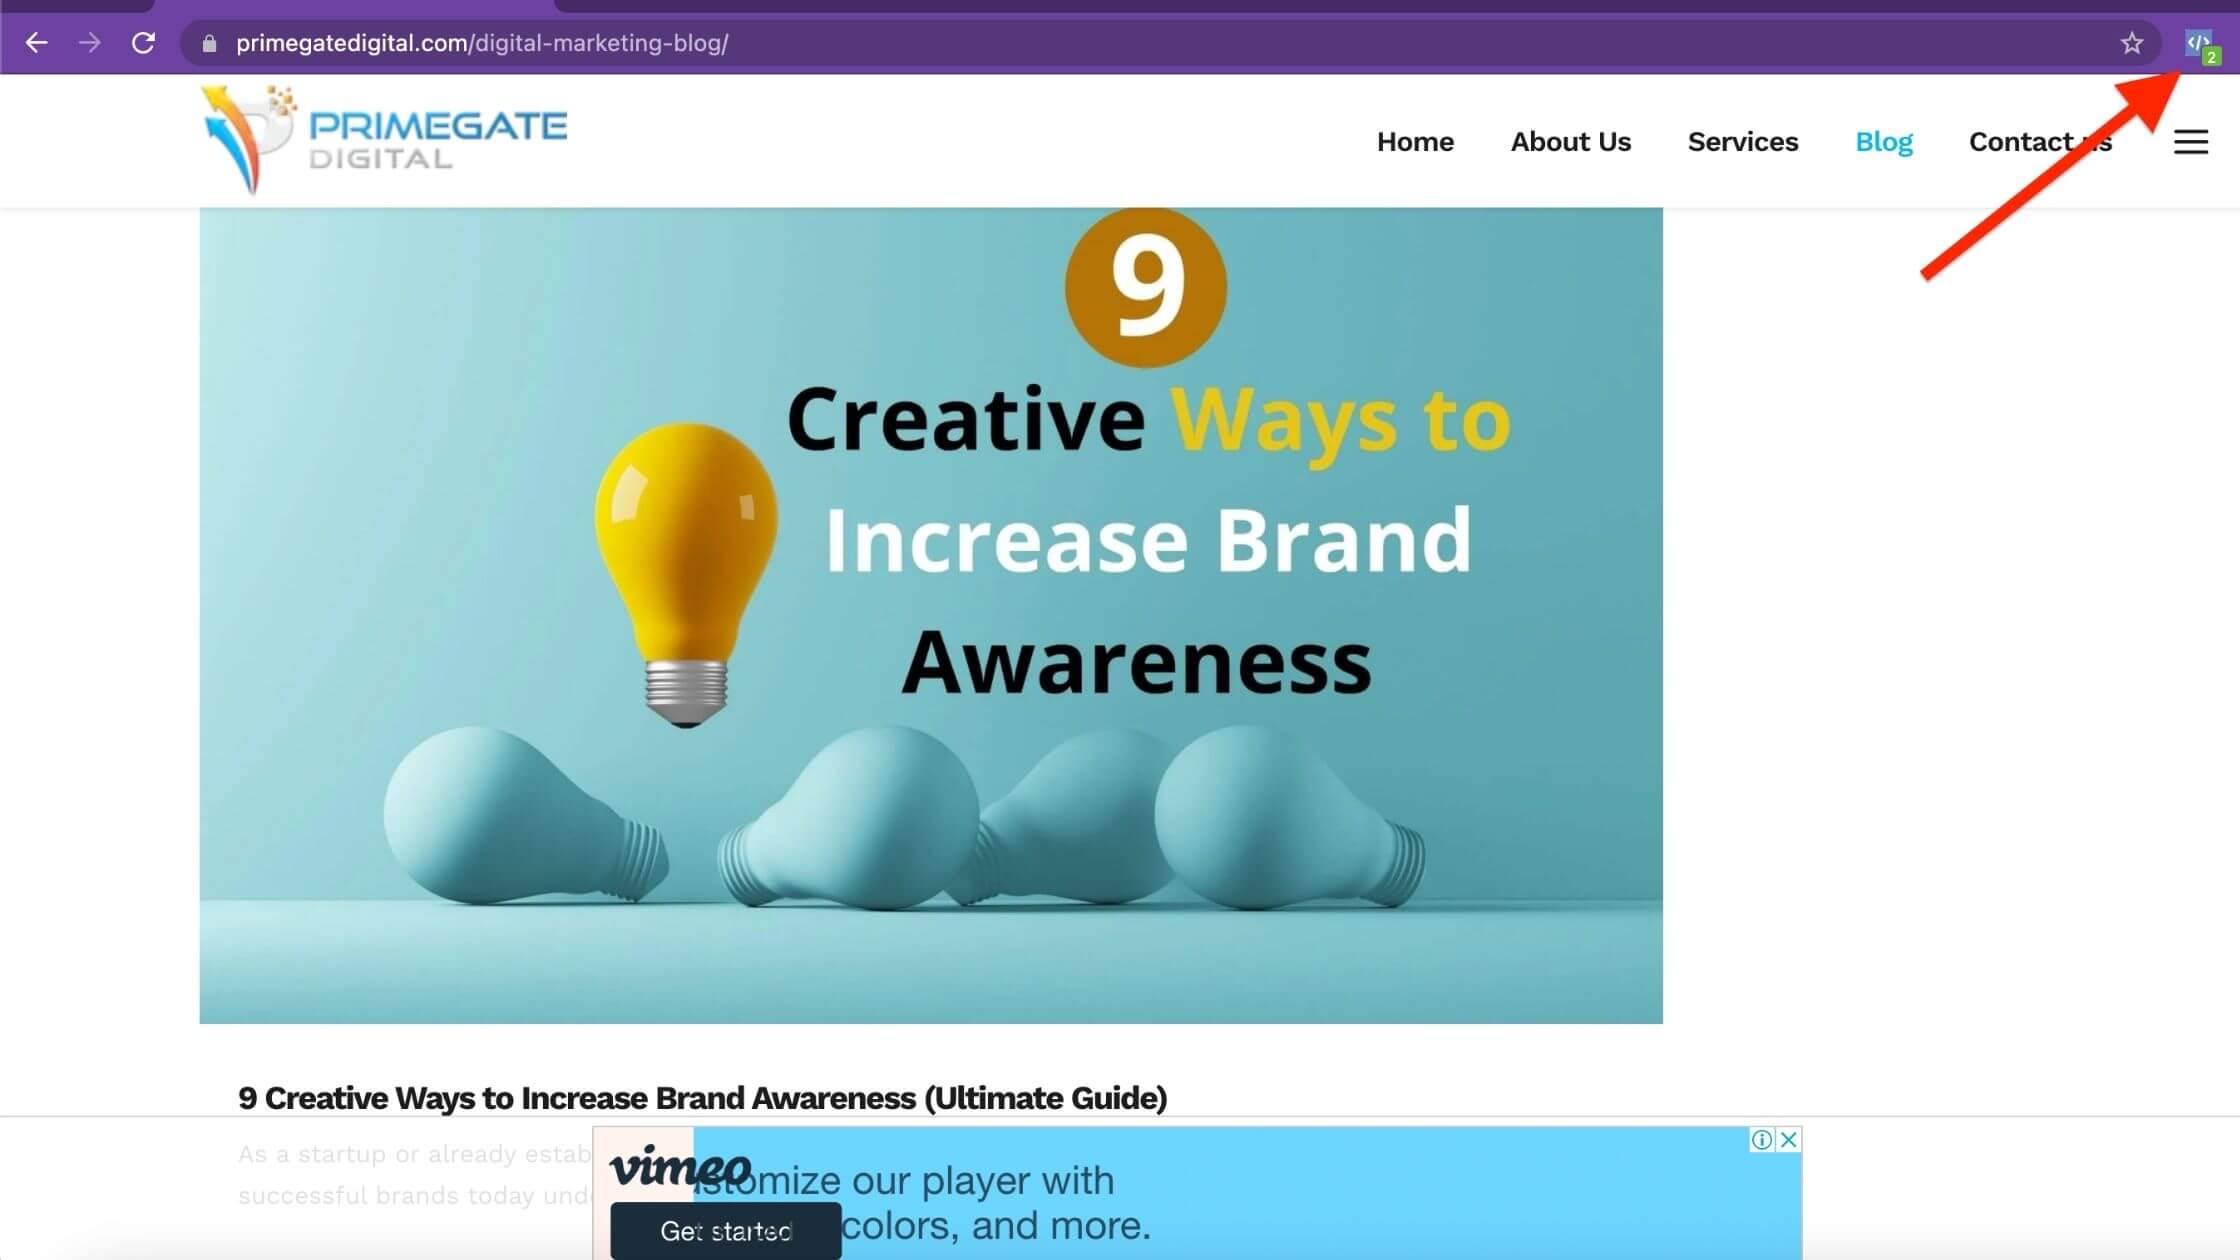
Now you have confirmed that your pixel has been successfully installed, let’s set up conversion events.
How to Set up Facebook Pixel Events
1. Click Add Events
2. Select From the Pixel
3. Click the Open Event Setup Tool button.
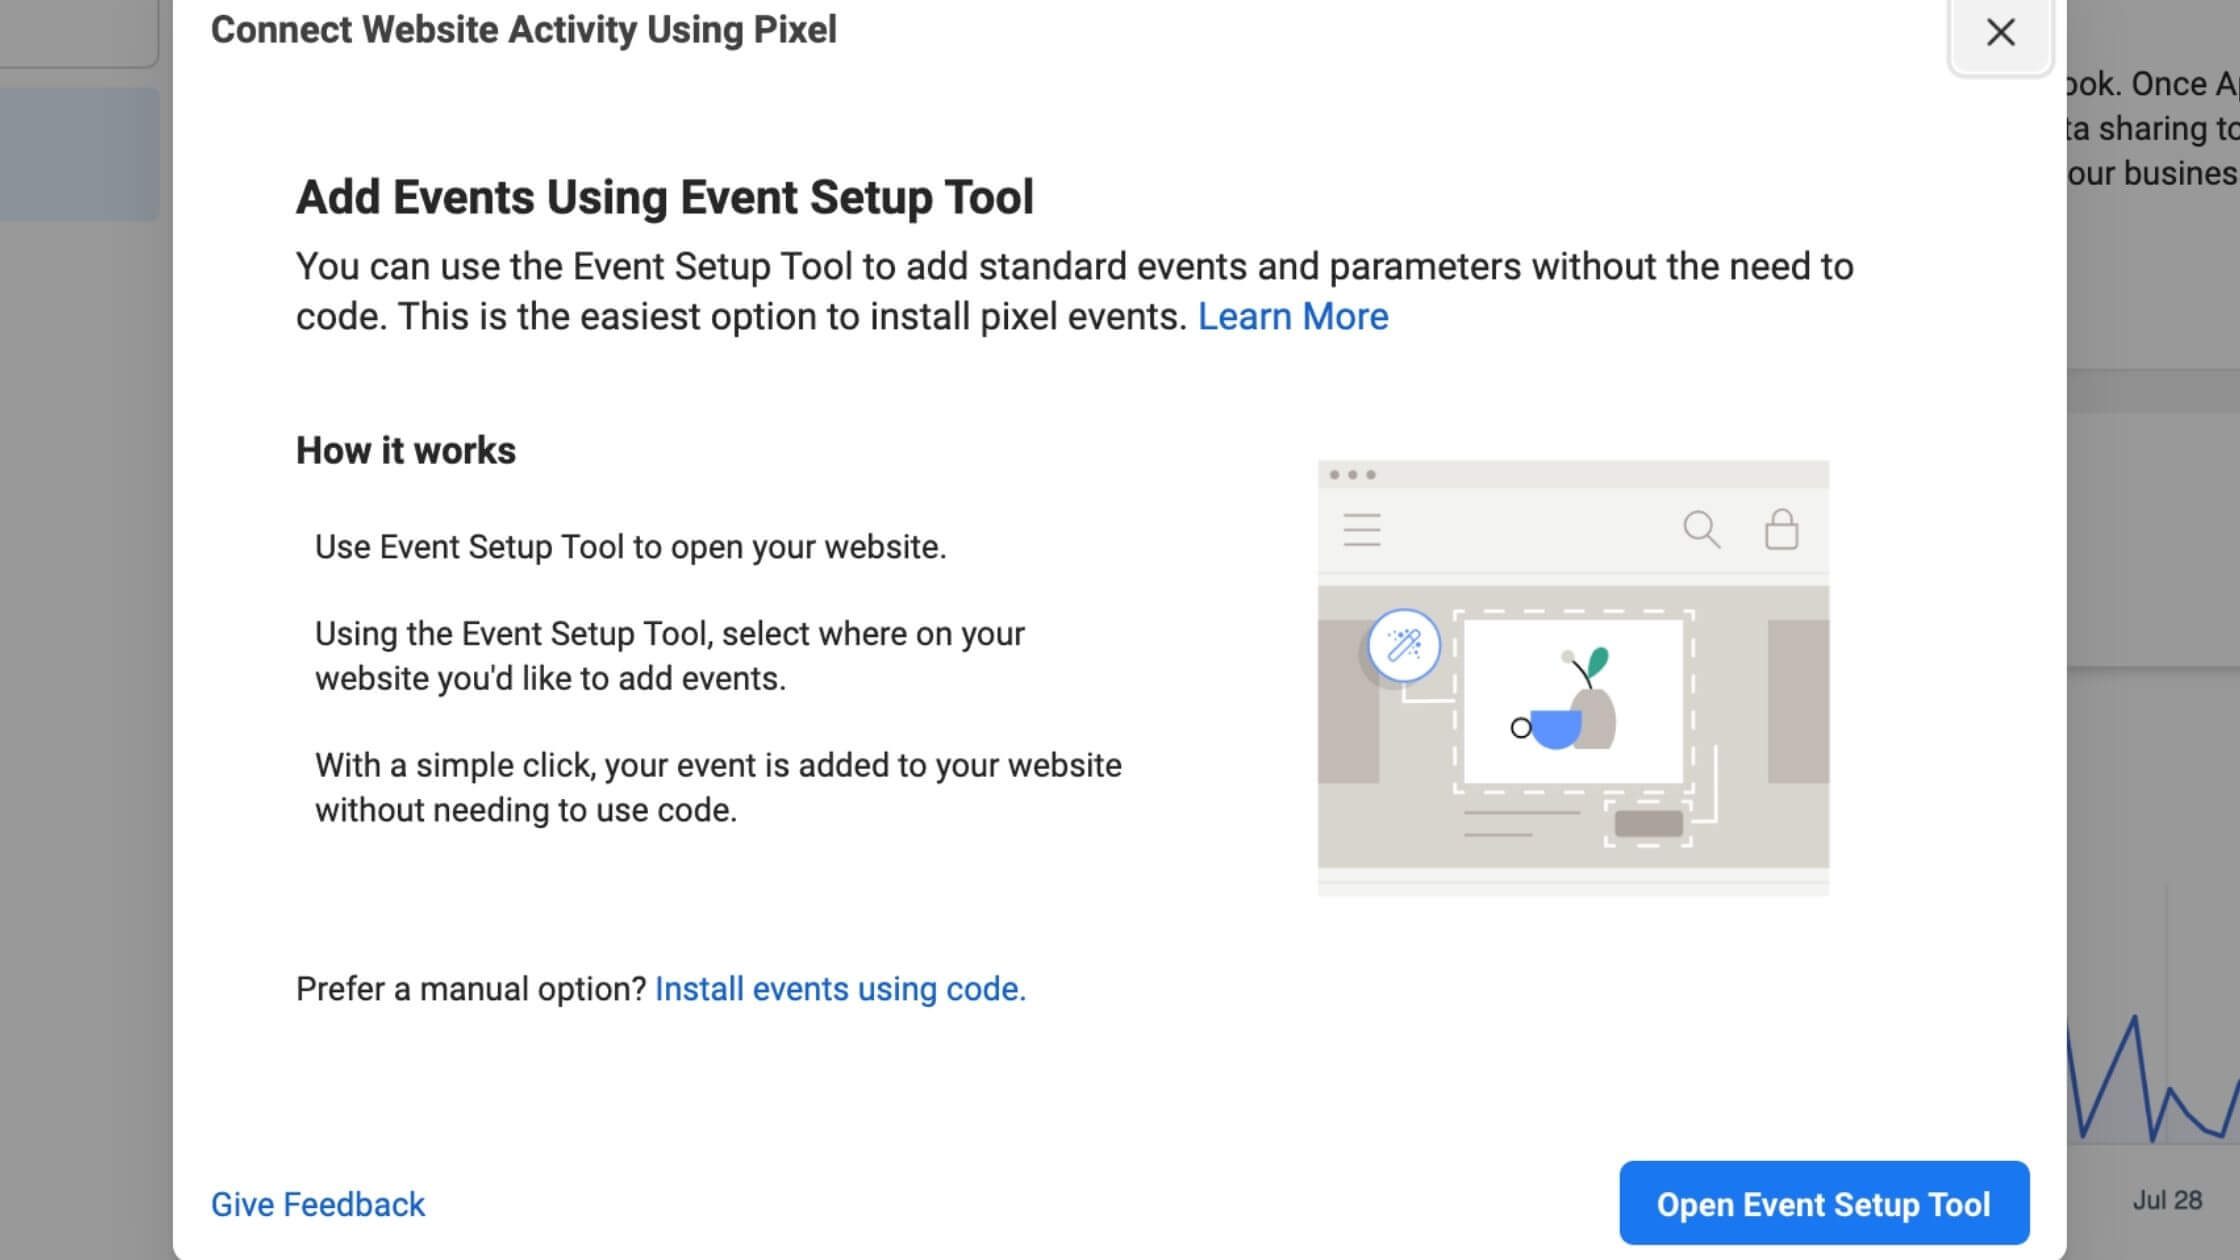
Source: Facebook Events Manager
2. Enter your website URL and click Open Website.
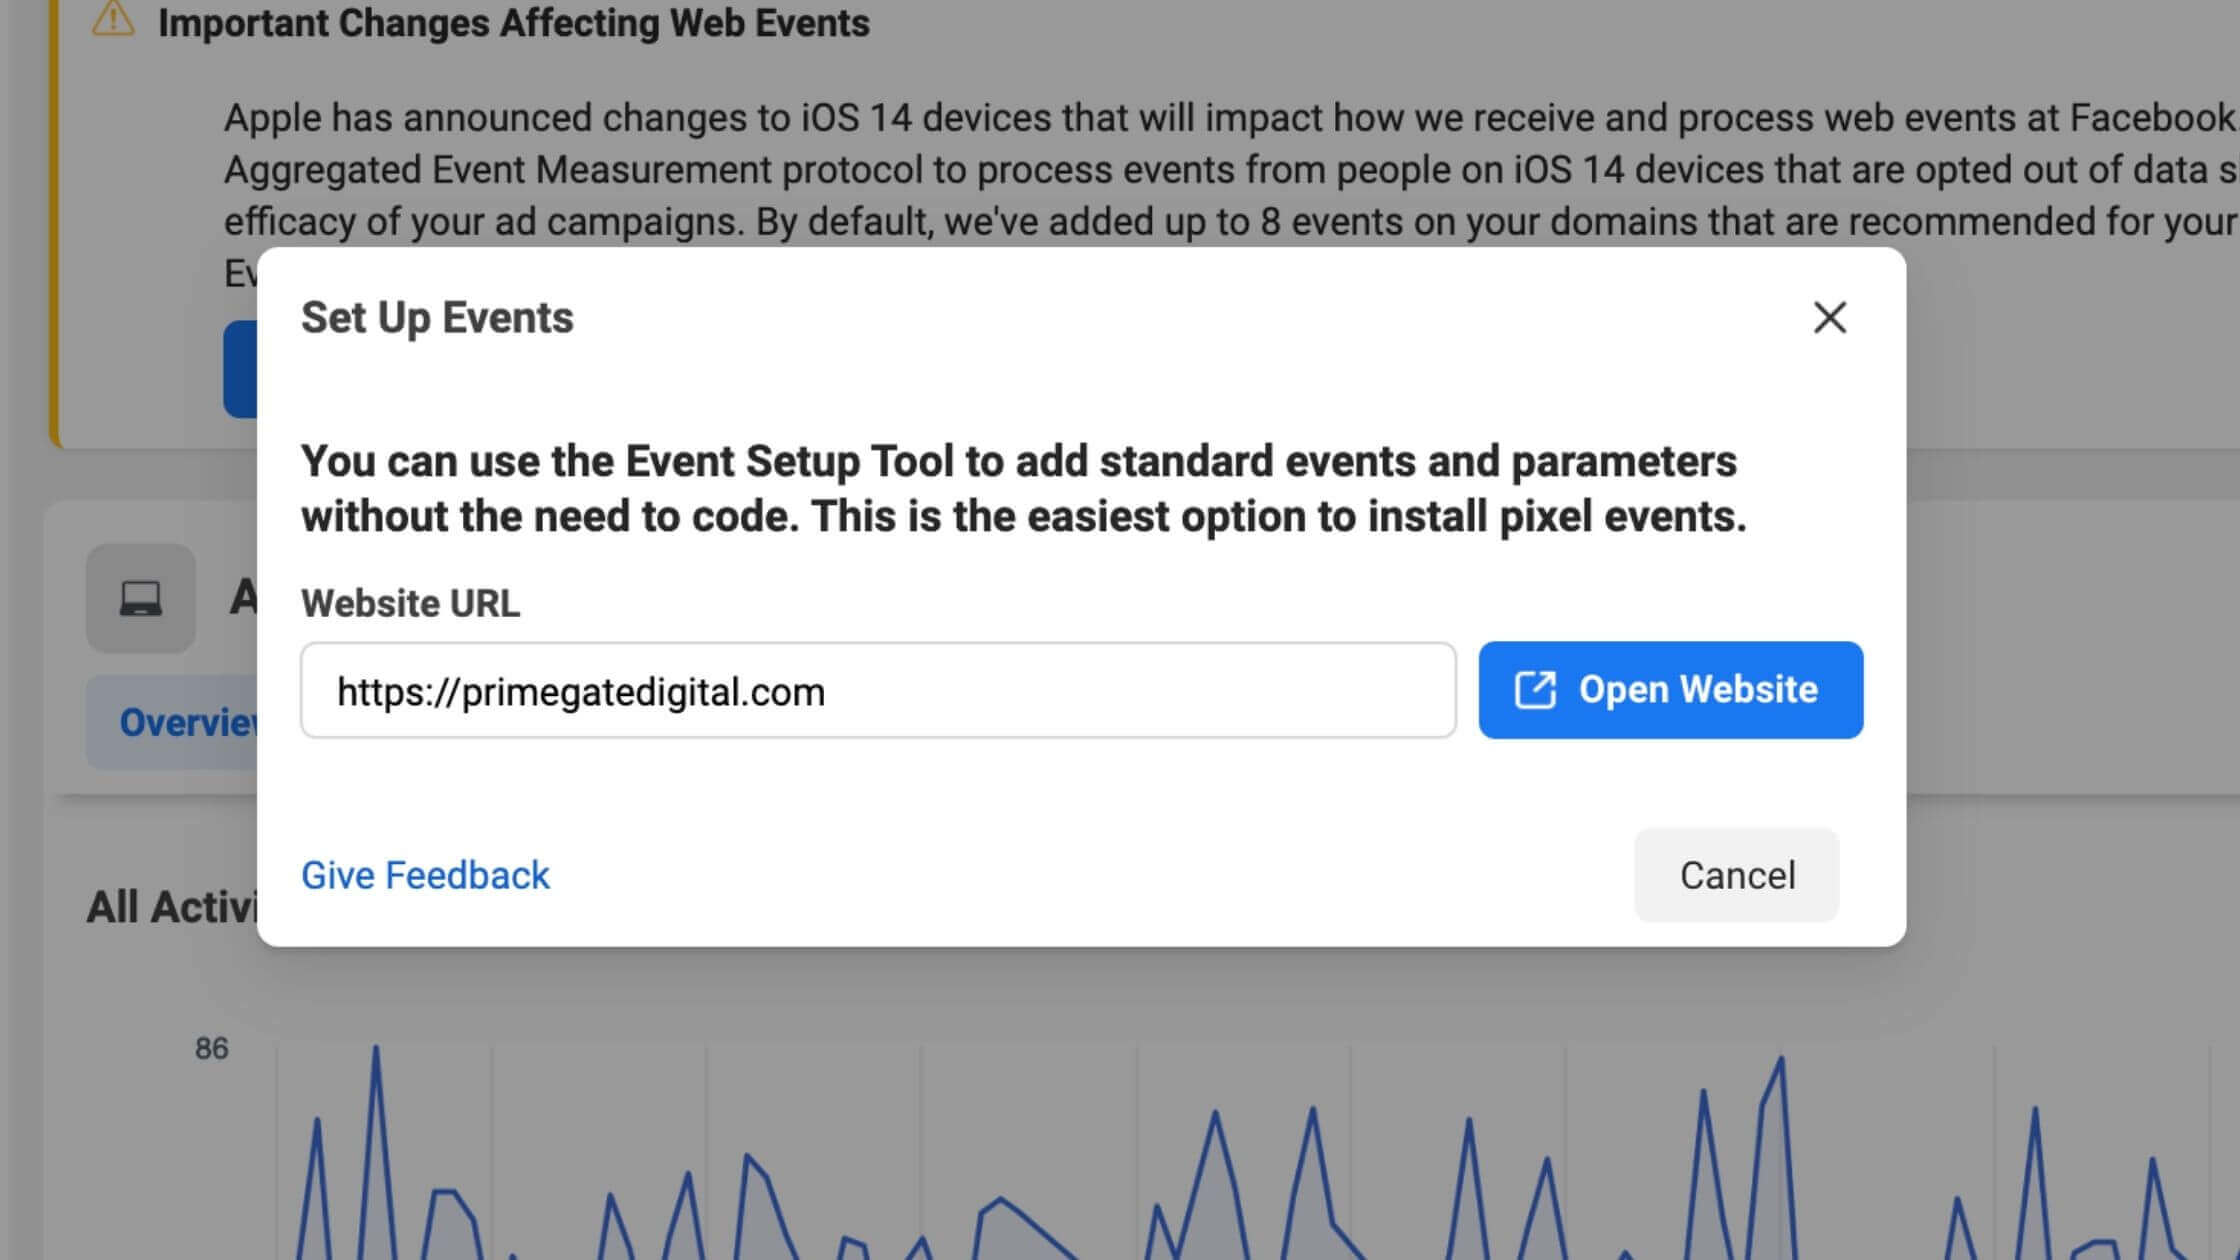
Source: Facebook Events Manager
With Facebook pixel helper, you can track either URL or button.
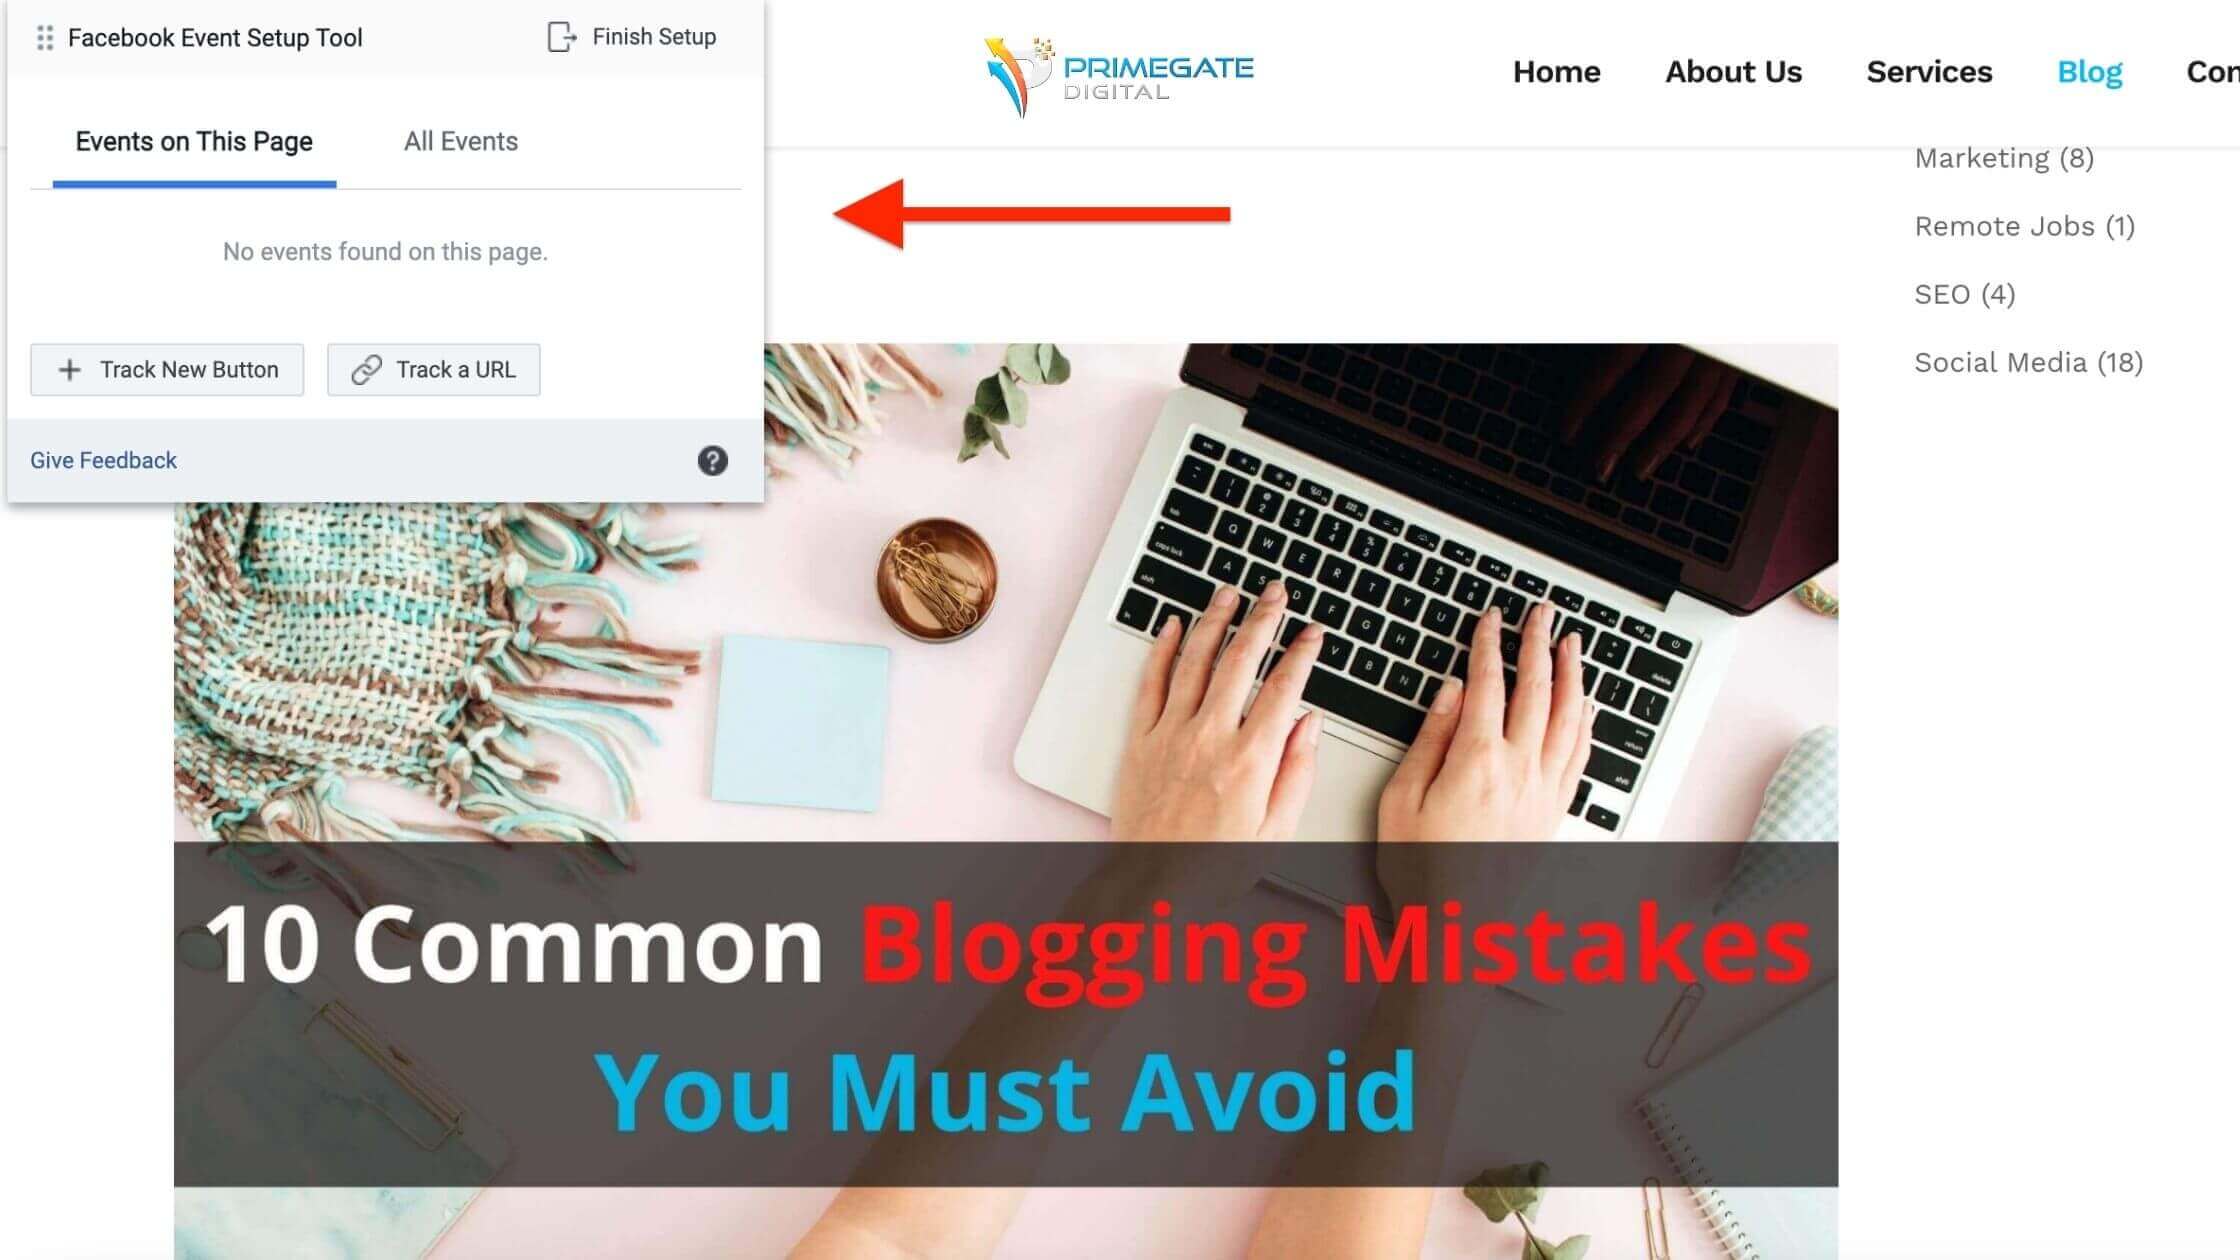
3. Facebook will suggest a list of events. Select. the event that. matches what you want to track, then choose to Confirm or Dismiss. Click Finish Setup to continue.
See Also: 9 Creative Ways to Promote Reels on Instagram
Using Facebook Conversions API to Improve Performance
To help minimize the impact of iOS14.5 changes, Facebook launched Conversions API. Instead of relying only on data from cookies, web and mobile browsers, Conversions API receives data directly from your website servers.
By combining Conversions API with the Facebook pixel, you’ll have more control over your data and besides, it reports data that the pixel is unable to capture.
If you’re using one of Facebook’s integration partners, like Shopify, WordPress or WooCommerce, you can toggle Conversions API on without making any changes to the code.
1. Goto Events Manager, > Data Sources, then click Settings in the top menu.
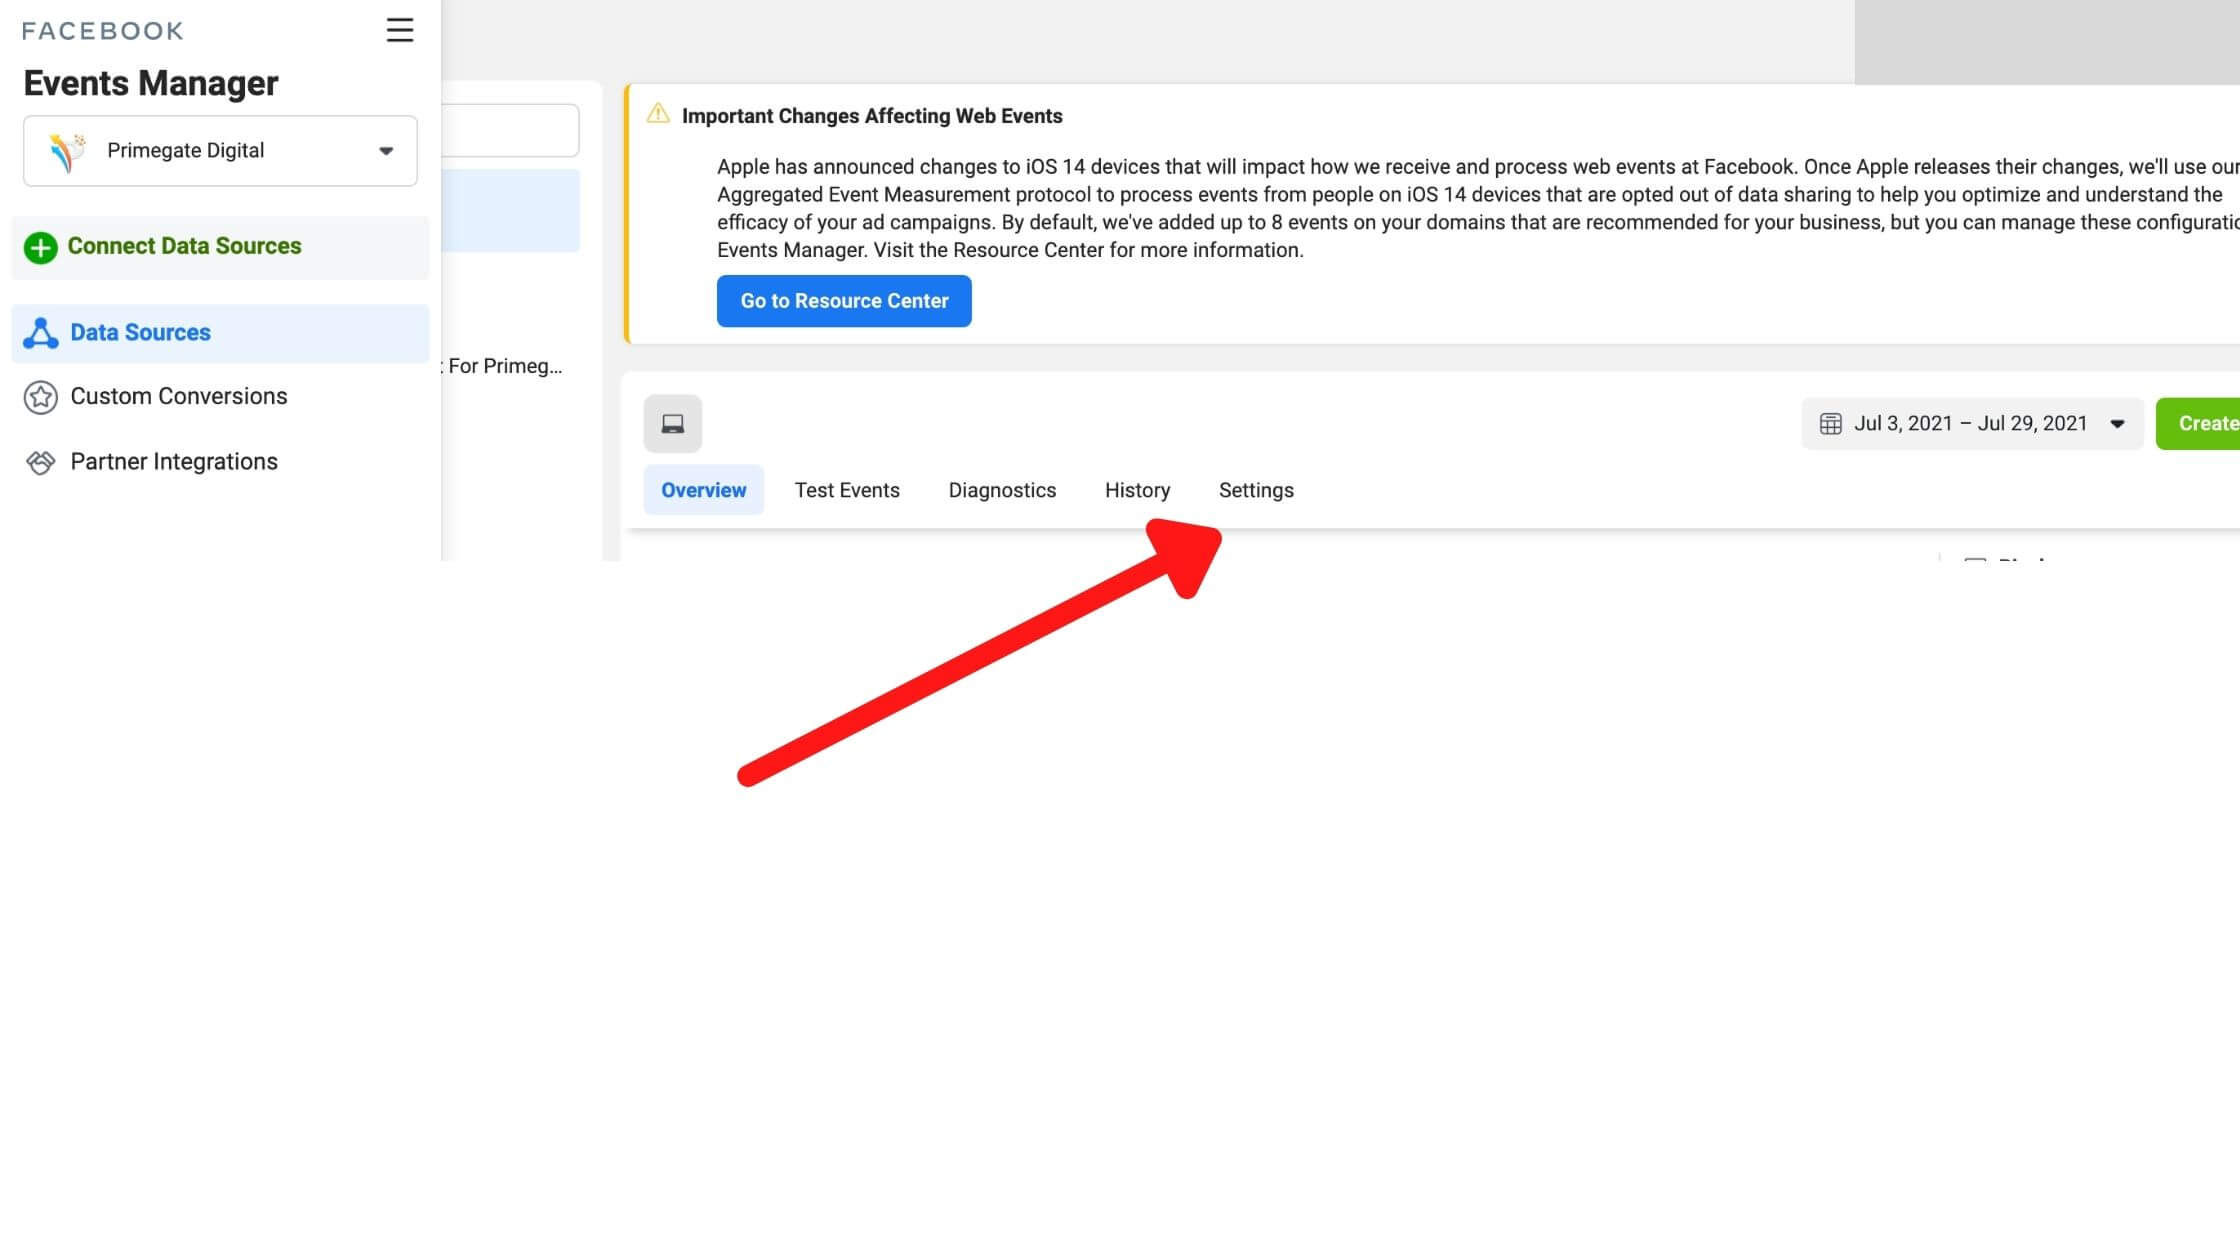
Source: Facebook Events Manager
2. Scroll down to the Conversions API section and Click Choose a Partner.
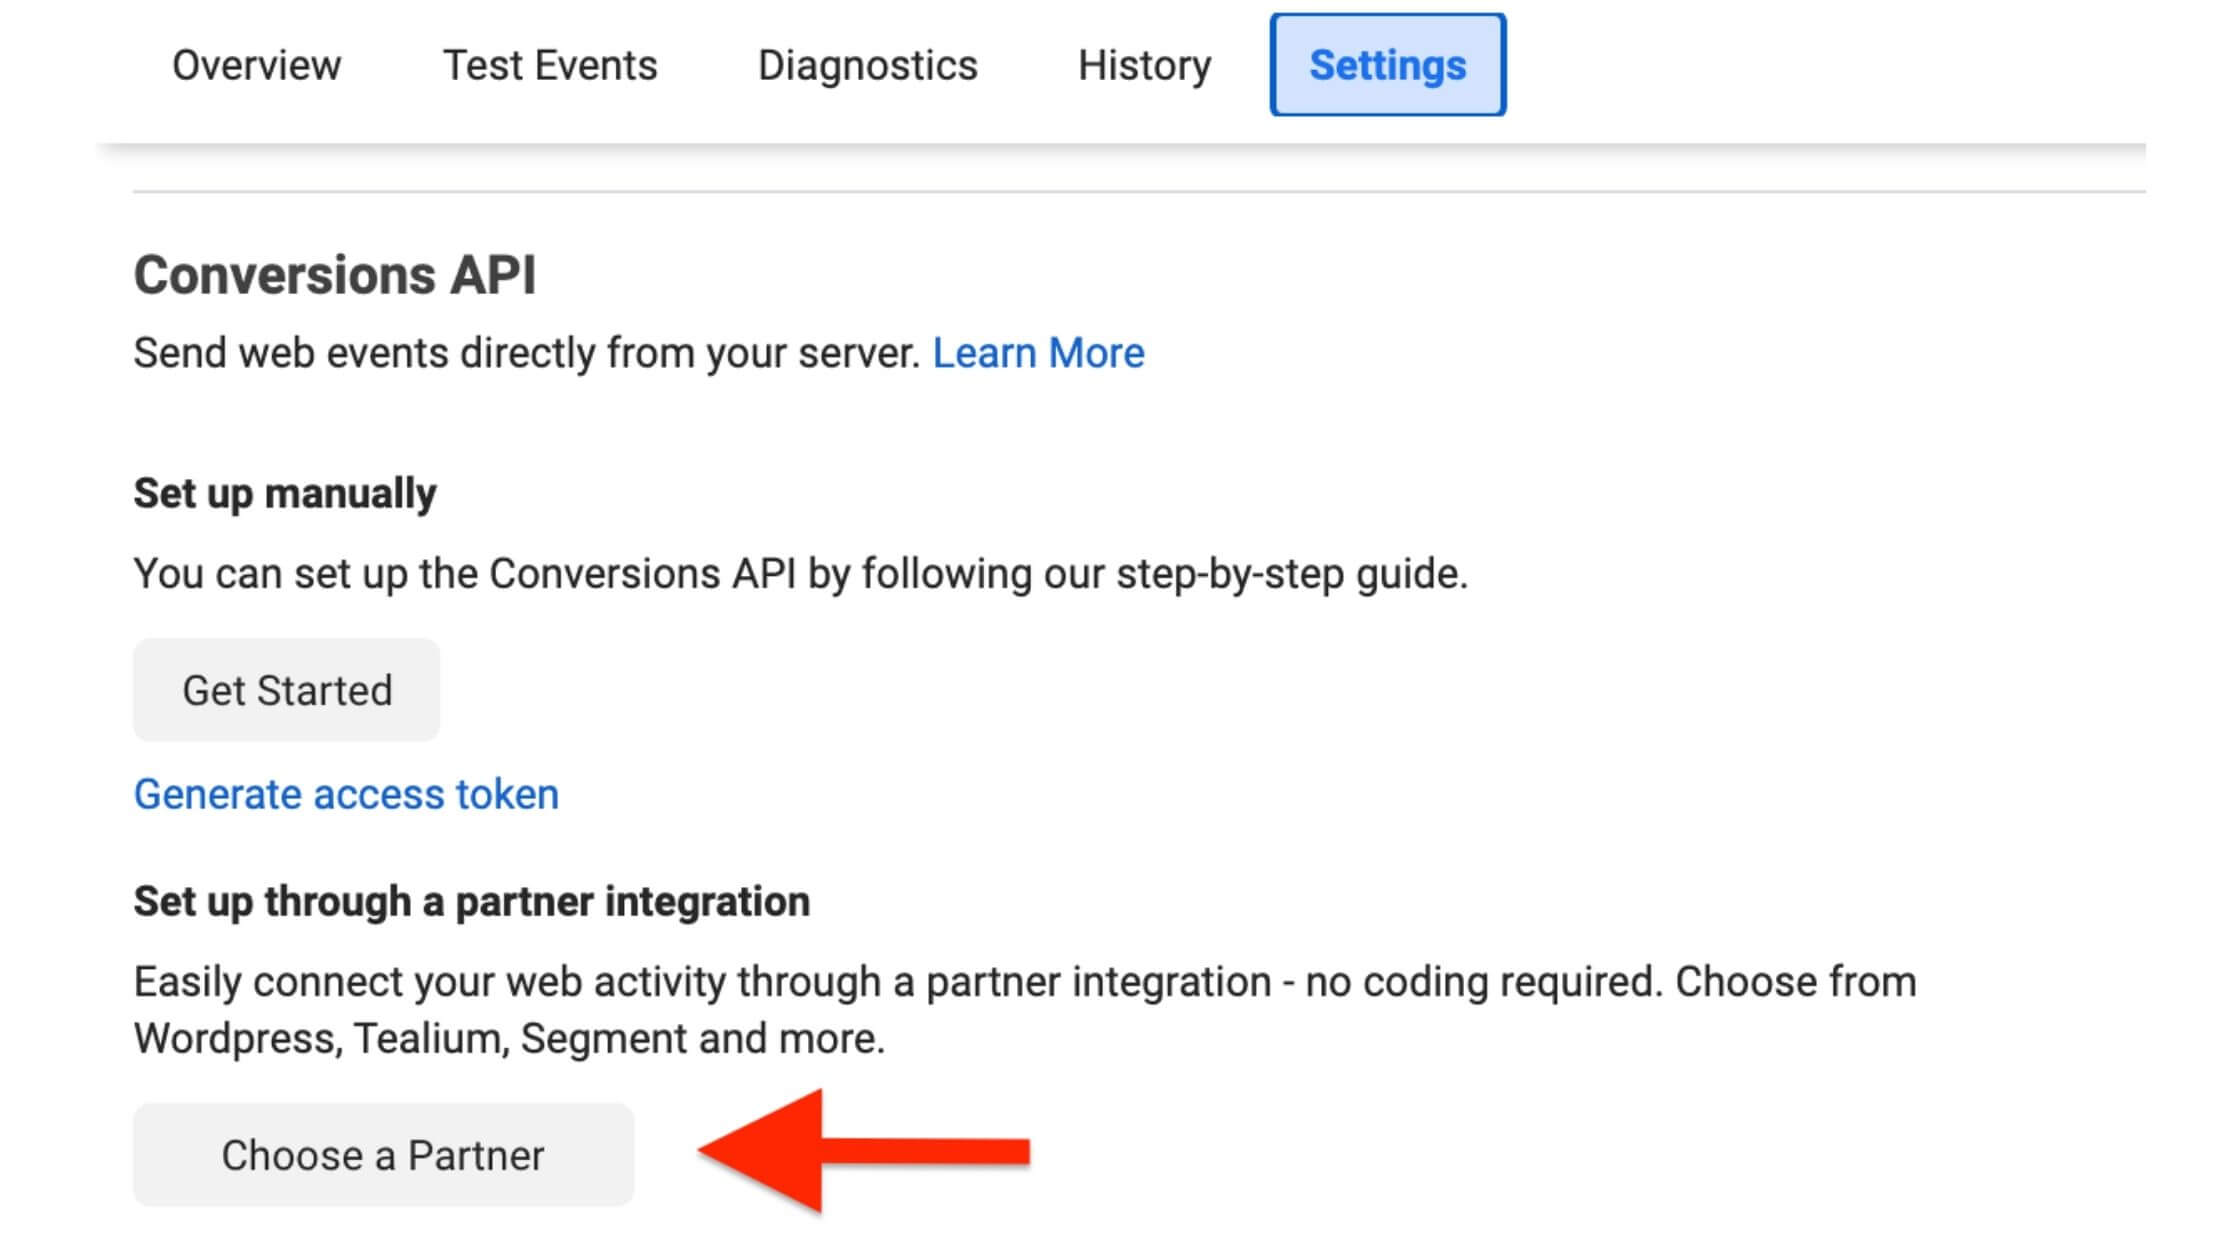
Source: Facebook Events Manager
Now you can choose your partner and follow the steps. Here’s a detailed instruction on how to set up the Facebook pixel Shopify Conversions API integration.
Perhaps you don’t use one of Facebook’s integration partners, you’ll have to set up the conversion API manually. This will require you to work closely with a developer. Follow how to implement Facebook’s Conversions API manually.
Please note that the website’s custom audiences have a retention of 180 days. Hence, installing the Facebook pixel now could help you optimize your Facebook ads 180 days down the line.
Conclusion
Having a Facebook pixel and Conversions API installed and firing accurately is the first step to creating a successful campaign. As detailed above, you have data that can help you scale your Facebook campaign easily.
I hope that this article on how to set up a Facebook pixel has been of great value to you in becoming an expert at setting up a Facebook pixel.
Also Read:
 PrimeGate Digital is a Result Driven Blog that strives to go beyond ‘Conventional Digital Marketing’ through digital innovation and performance marketing. We have experience working with world class brands and products.
